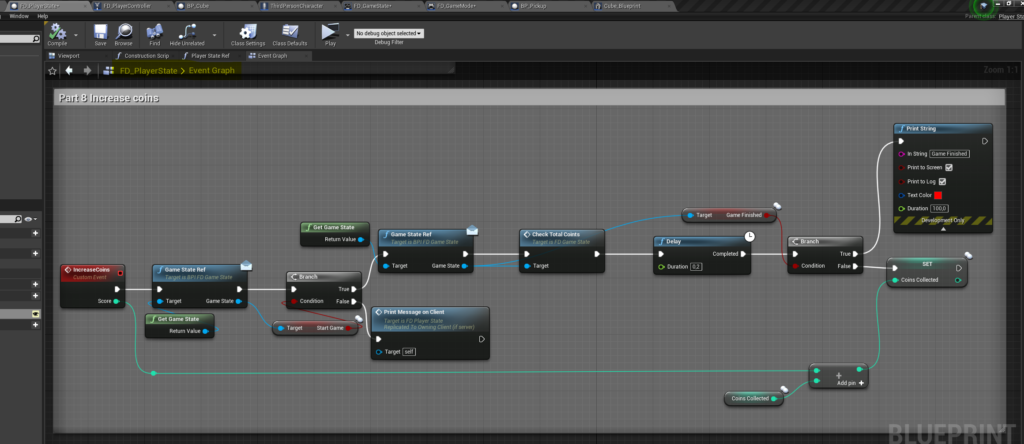
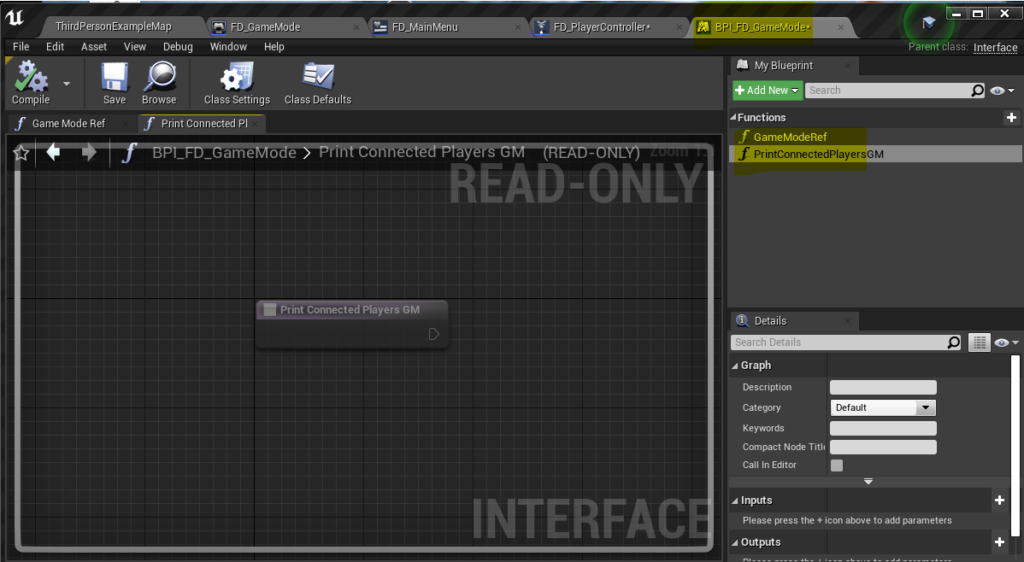
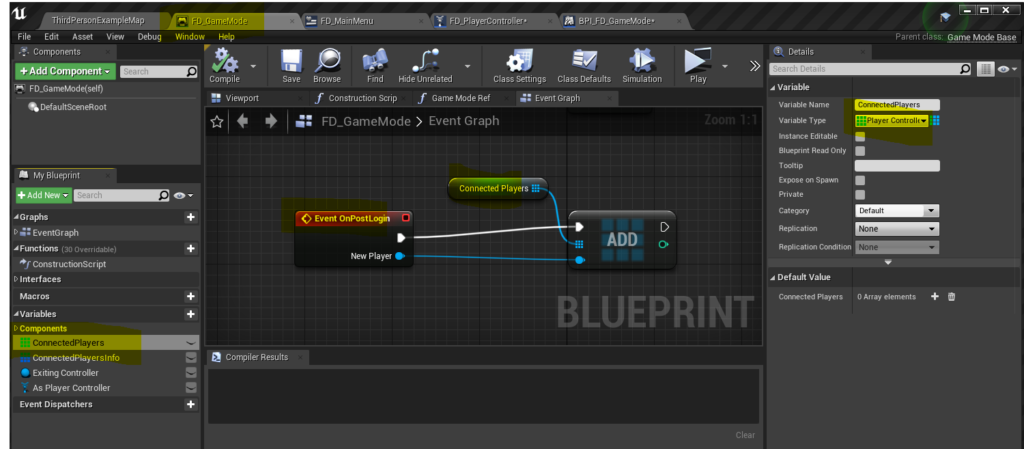
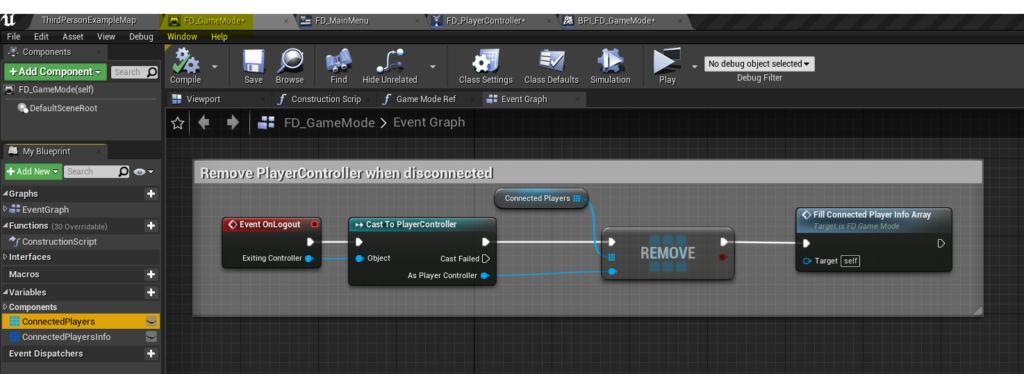
Part 8 : Gamestate and PlayerState

Back to main post

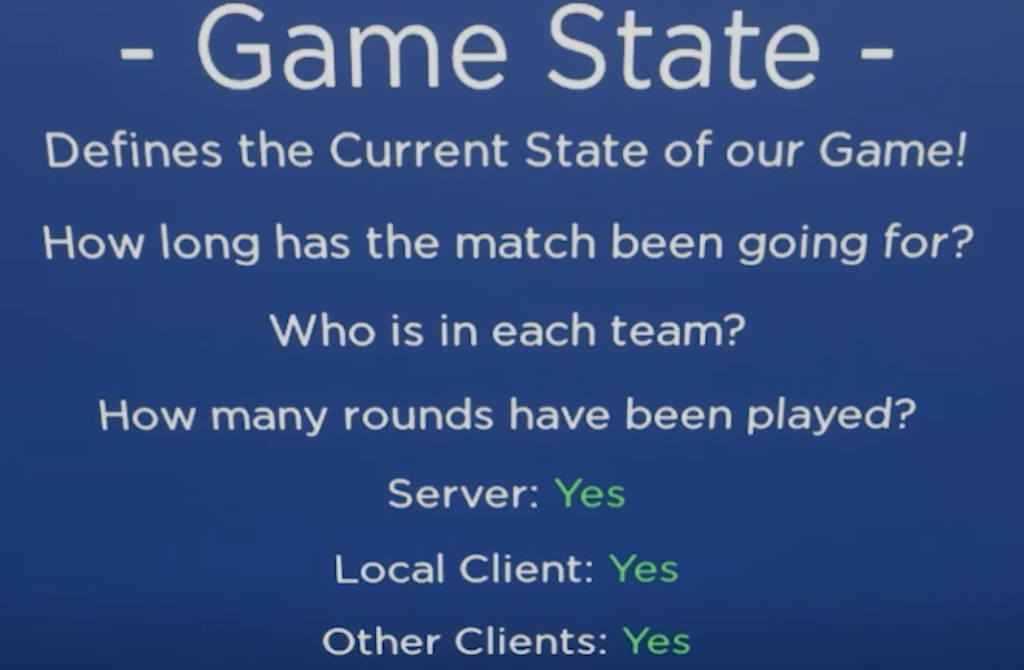
According to documentation: The GameState exists on the server and the clients, so the server can use replicated variables on the GameState to keep all clients up-to-date on data about the game. Information that is of interest to all players and spectators, but isn’t associated with any one specific player, is ideal for GameState replication. As an example, a baseball game could replicate each team’s score and the current inning via the GameState.

https://docs.unrealengine.com/en-US/API/Runtime/Engine/GameFramework/AGameState/index.html

According to documentation: A PlayerState will exist for every player connected to the game on both the server and the clients. This class can be used for replicated properties that all clients, not just the owning client, are interested in, such as the individual player’s current score in a free-for-all game. Like the PlayerController, they are associated with individual Pawns, and are not destroyed and respawned when the Pawn is.

https://docs.unrealengine.com/en-US/API/Runtime/Engine/GameFramework/APlayerState/index.html

For this part I will make a little game : Collecting coins.
At the start there are for example 1000 coins in the bank. Each player can collected coins. When there are no coins left in the bank, the game is finished. Each client gets a message showing the coins collected by each player.

Although it looks a bit overdone for such a small game, I used gamemode, gamestate and playerstate:

  • Gamemode : Setting the max coins in the bank (1000)
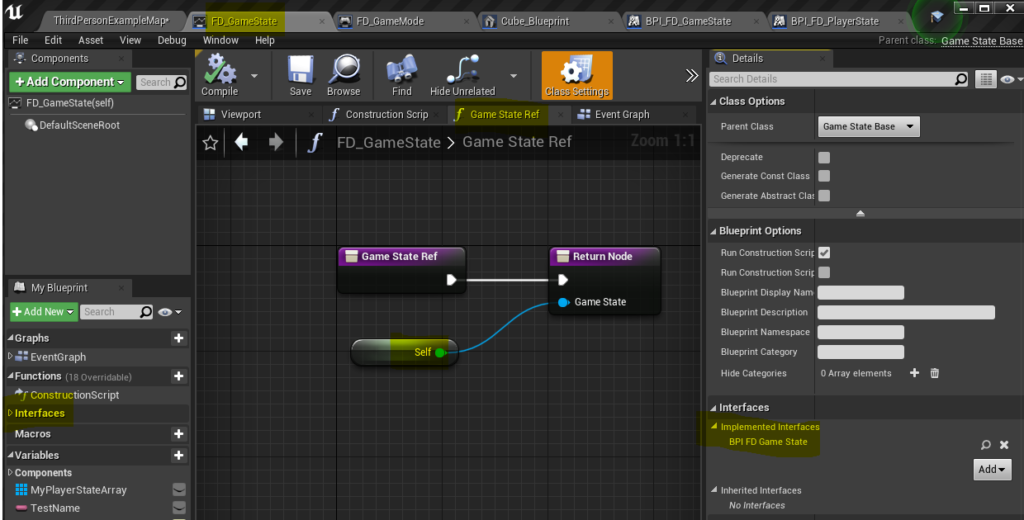
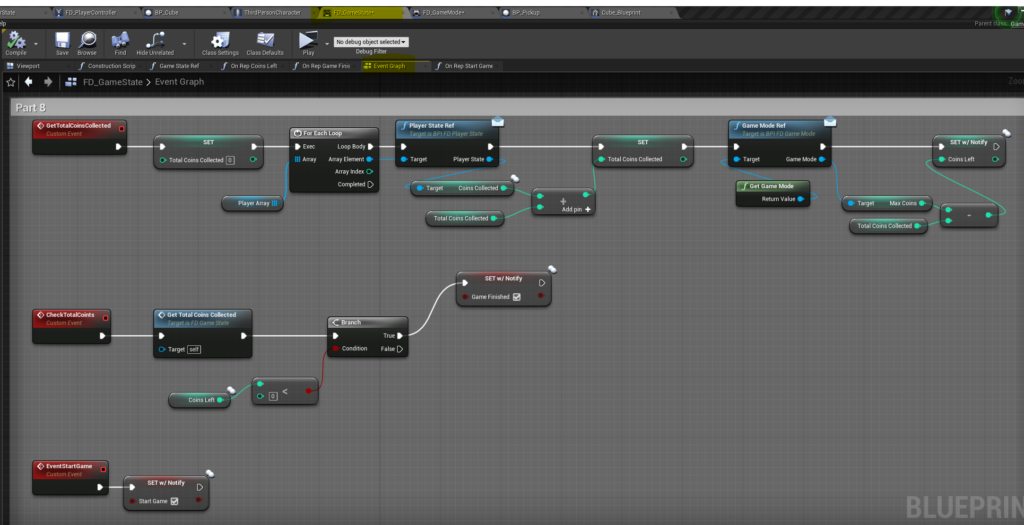
  • Gamestate : Calculating collected coins by players and check if coins in bank are finished.
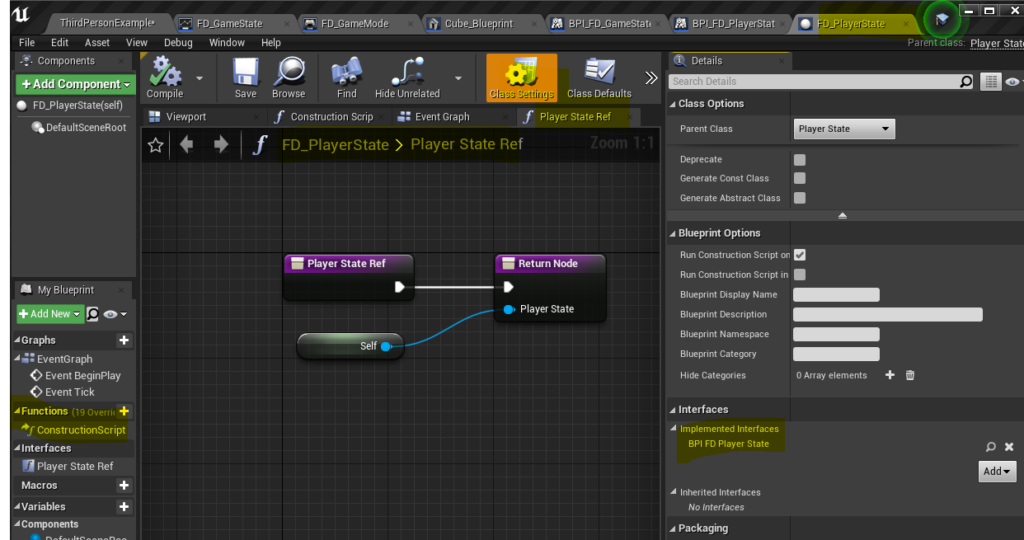
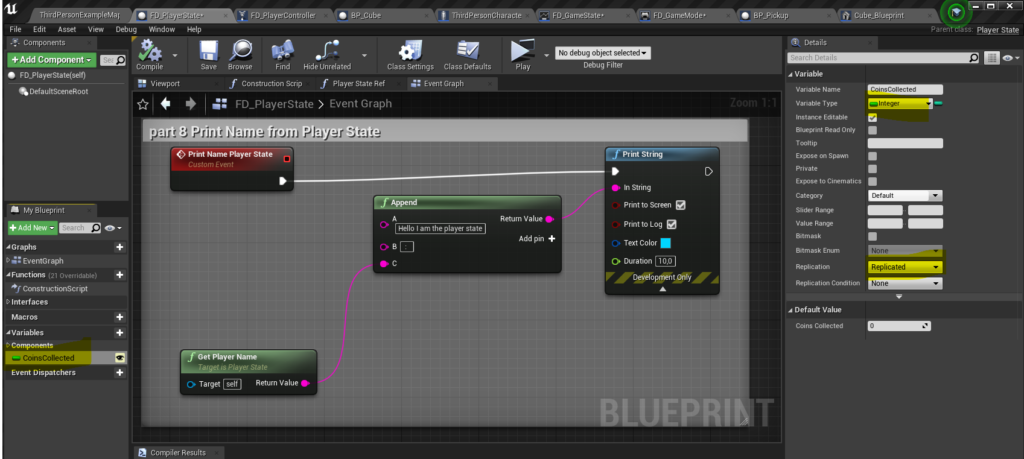
  • Playerstate : Tracking number of coins collected by player.
  • Playercontroller : used for connecting menu widget with gamestate and playerstate.

In the next screenshots I show the final blueprints, when building you most likely need to go back and forth.

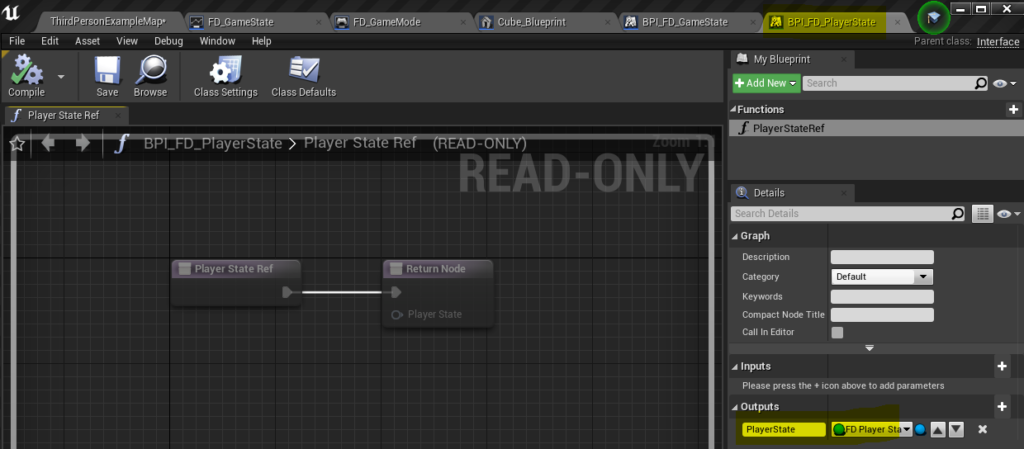
Note: I only used the interface of gamestate and playerstate to get a reference.
I should have used more functions going through the interface.

Step 1 Create Gamestate, create interface, create reference

Step 2 Create PlayerState, create interface, create reference
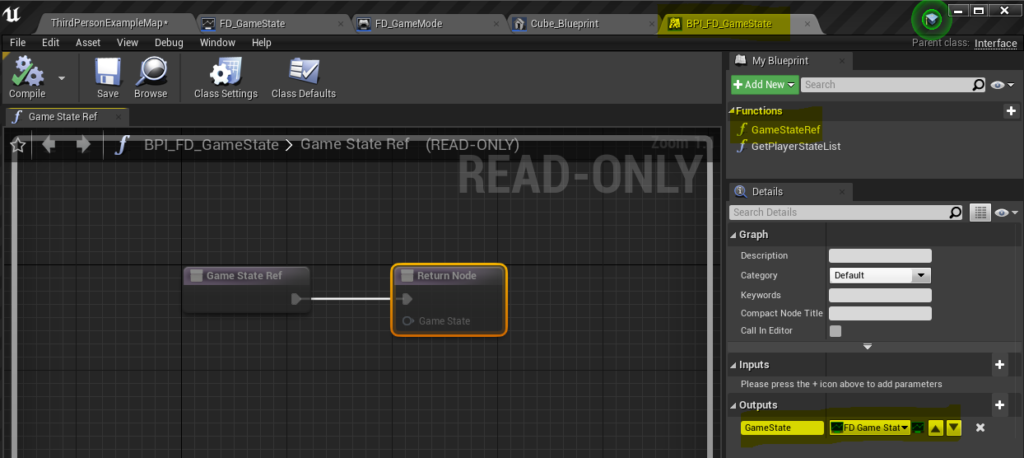
Step 3 Add Gamestate and Playerstate to you gamemode!!
At first I had forgotten to do this 🙁
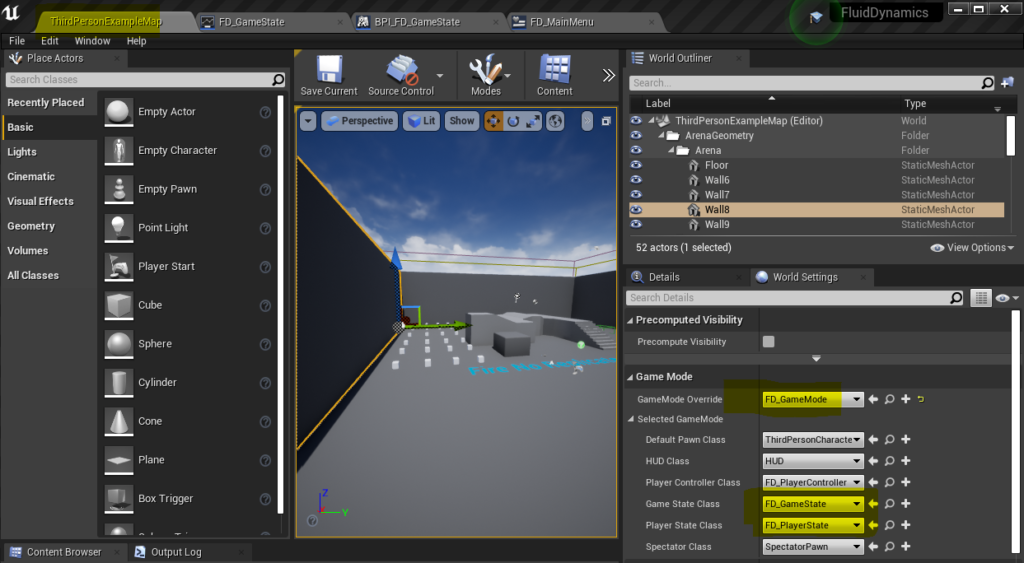
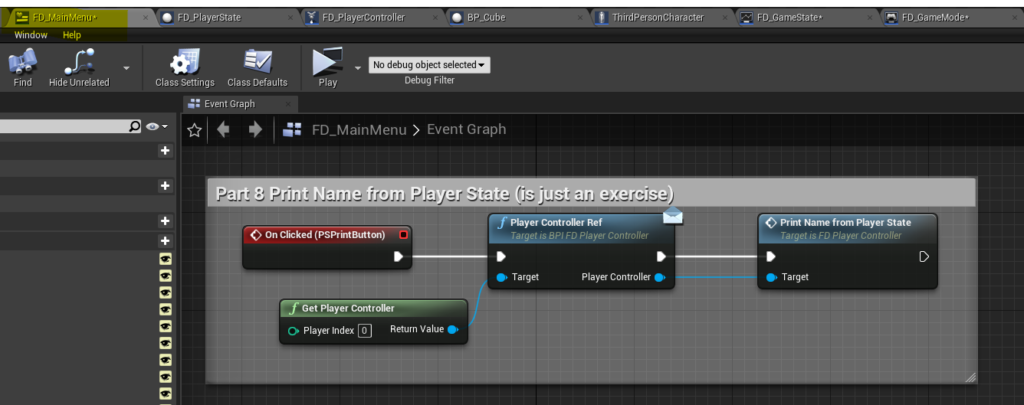
Step 4 Changes to the mainmenu
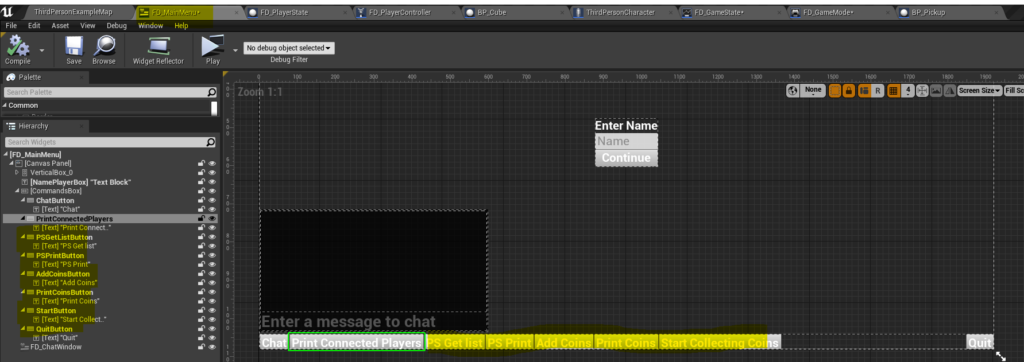
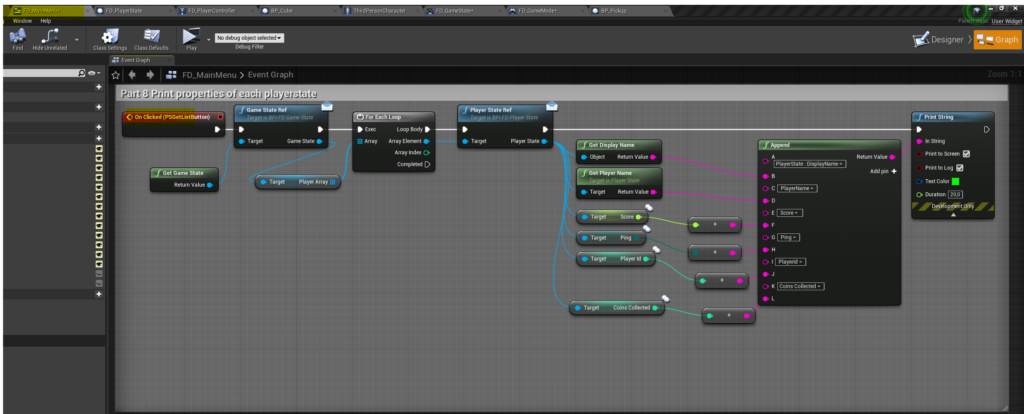
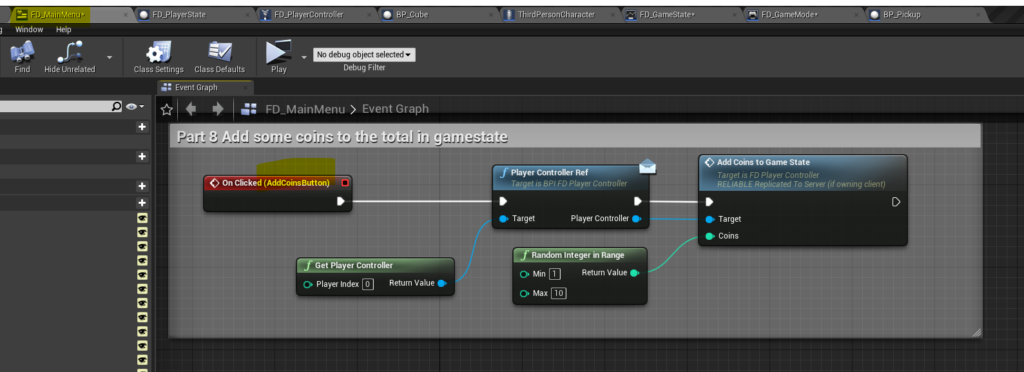
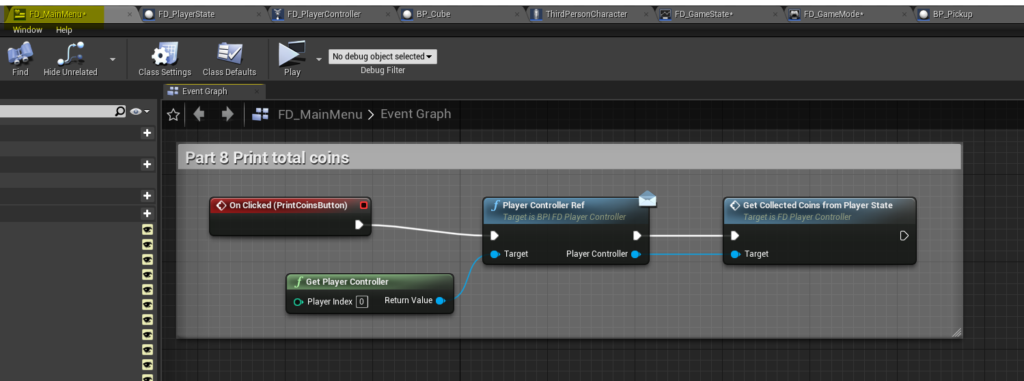
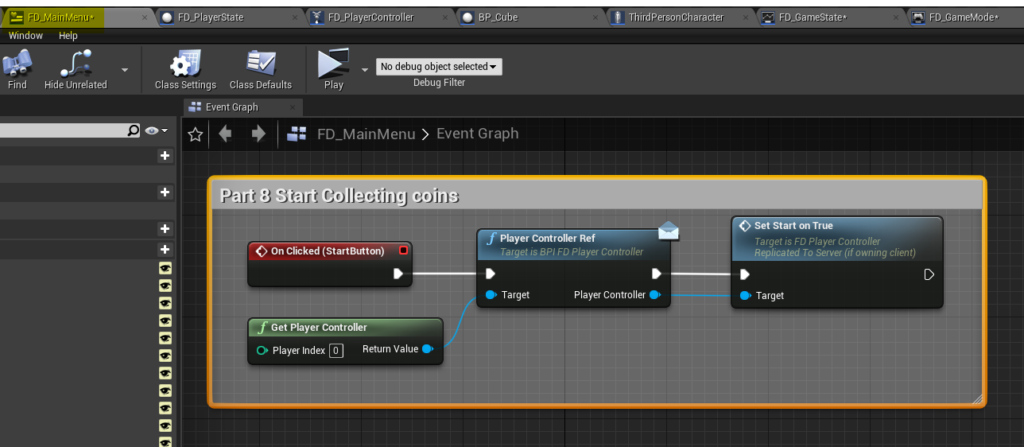
Added : PS Get List, PS Print, Add Coins, Print Coins, Start Collection Coins
PS Get List
Ps Print
Add Coins
Print coins
Start Collecting coins
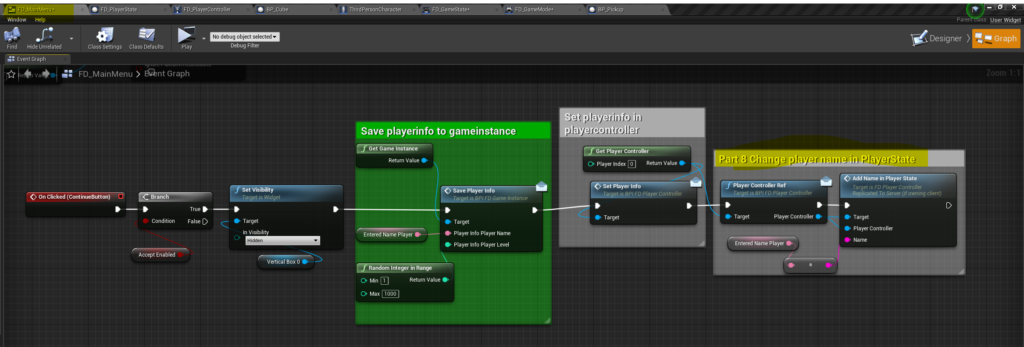
Add change player name in playerstate add the end of continuebutton

Step 5 GameMode

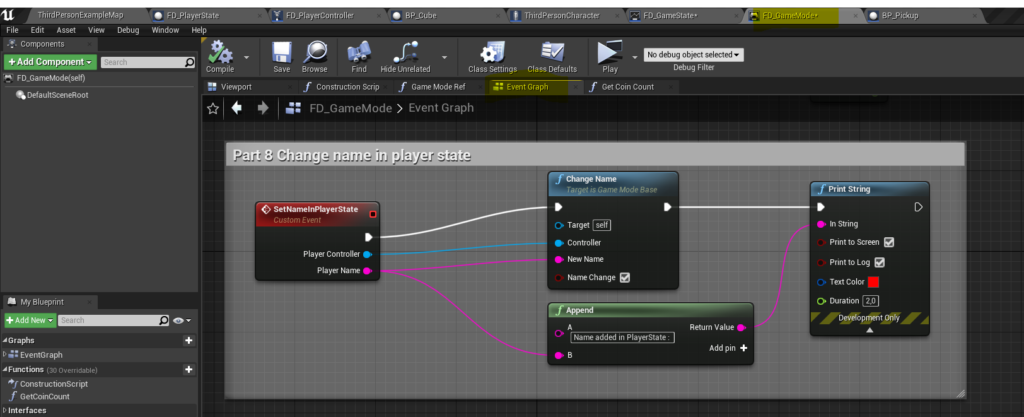
Event SetNameInPlayerState. This is the way to change the playername of the playerstate.
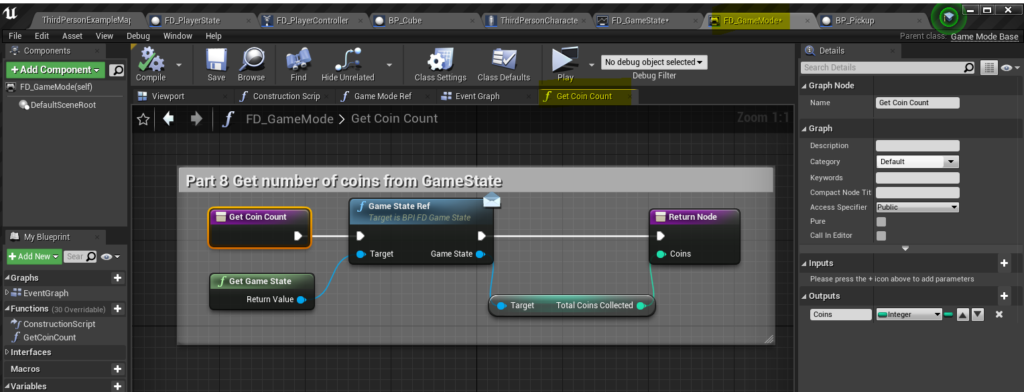
Function GetCoinCount
Variable Maxcoins

Step 6 GameState

Variable TotalCoinsCollected
CoinsLeft
GameFinished
StartGame
Blueprints Event Graph
On Rep Coins Left
On Rep Game Finished
On Rep Start Game

Step 7 : PlayerState

Event Print Name Player State and variable CoinsCollected
Increase coins
Several blueprints

Step 8 : Playercontroller

Most of the events in the playercontroller are necessary to connect the menu widget to the gamestate and playerstate. So they are called from the menu, to get something done in the gamestate or playerstate
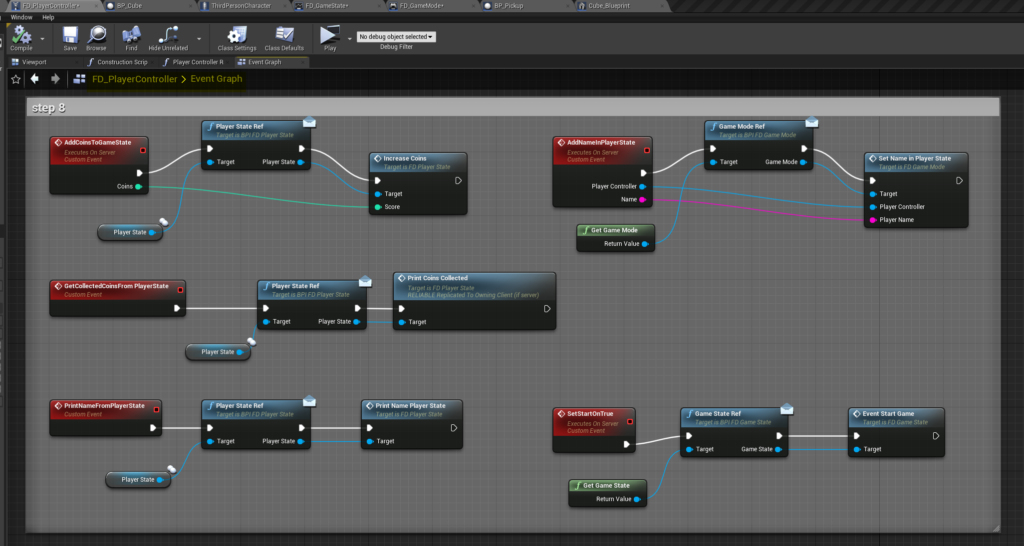
Blueprints Playercontroller

Step 9 : BP_Pickup

Changes made to the existing BP_Pickup. In the first event you should add an has authority switch, to make sure coins is only set on the remote. The dedicatie server has no coins (has no graphical interface). At first I got a warning in the dedicated server log.
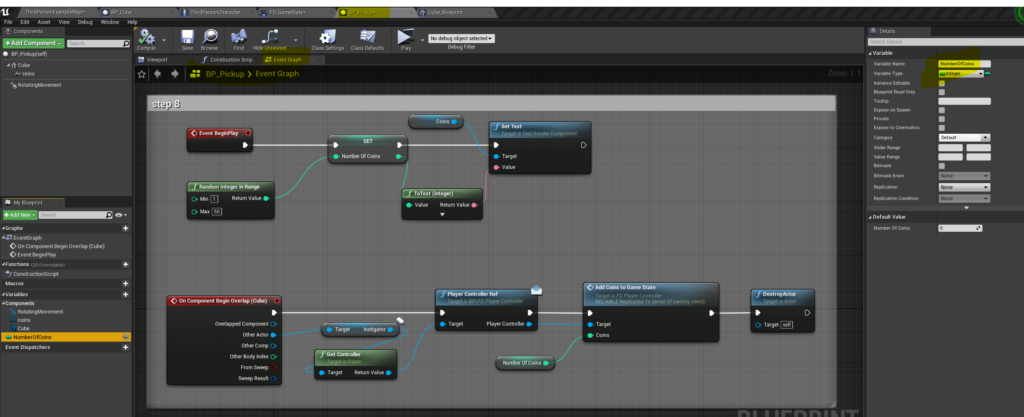
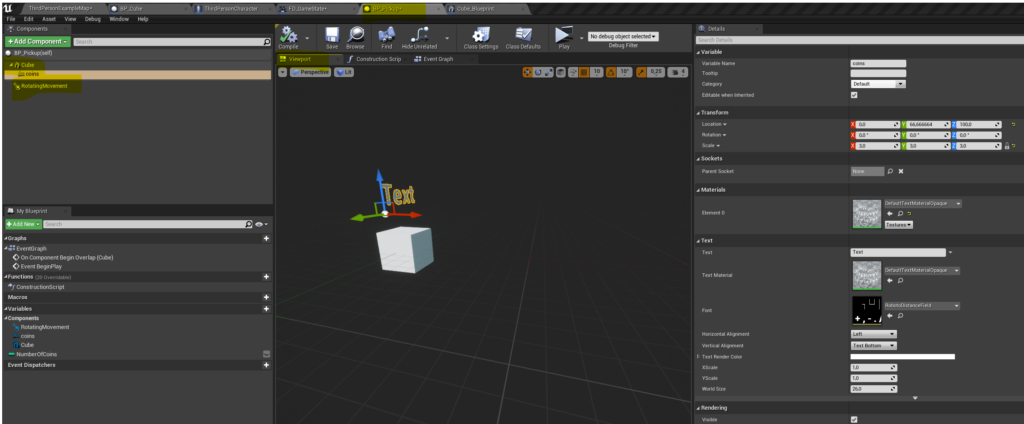
Blueprints Even graph and variable NumberOfCoins
Added textrenderer and RotatingMovement

Step 10 : New Blueprint with cube (only one) called BP_Cube
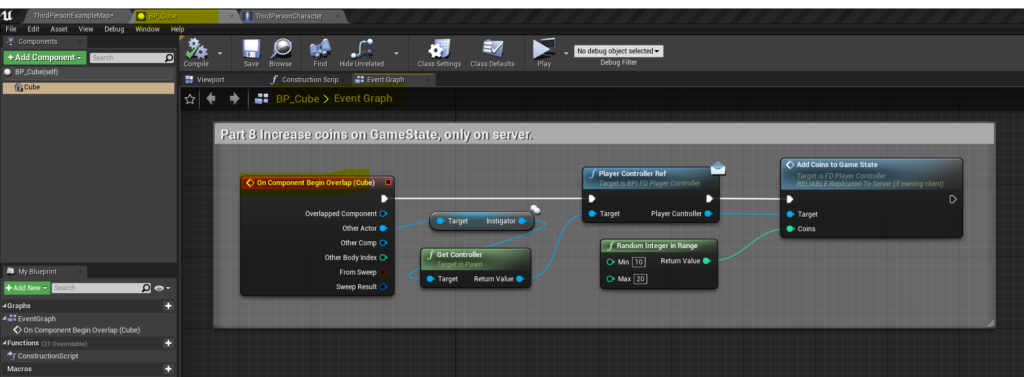
Blueprints Event graph

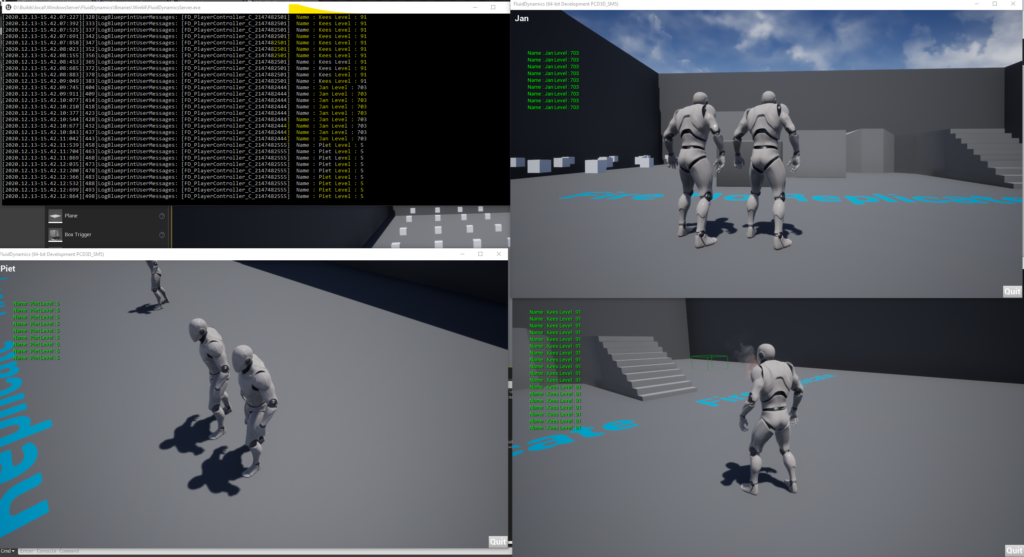
Result when running in multiplayer
Share Button

Part 7 : Gamemode

Back to main post

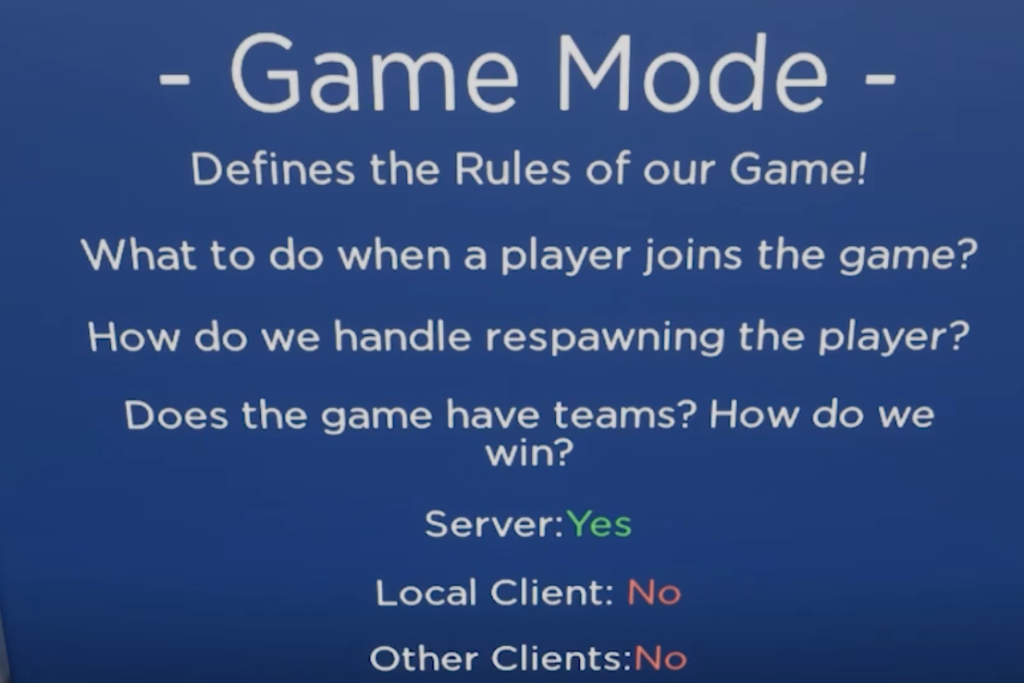
According to documentation: The GameMode object only exists on the server. It generally stores information related to the game that clients do not need to know explicitly. For example, if a game has special rules like “rocket launchers only”, the clients may not need to know this rule, but when randomly spawning weapons around the map, the server needs to know to pick only from the “rocket launcher” category.

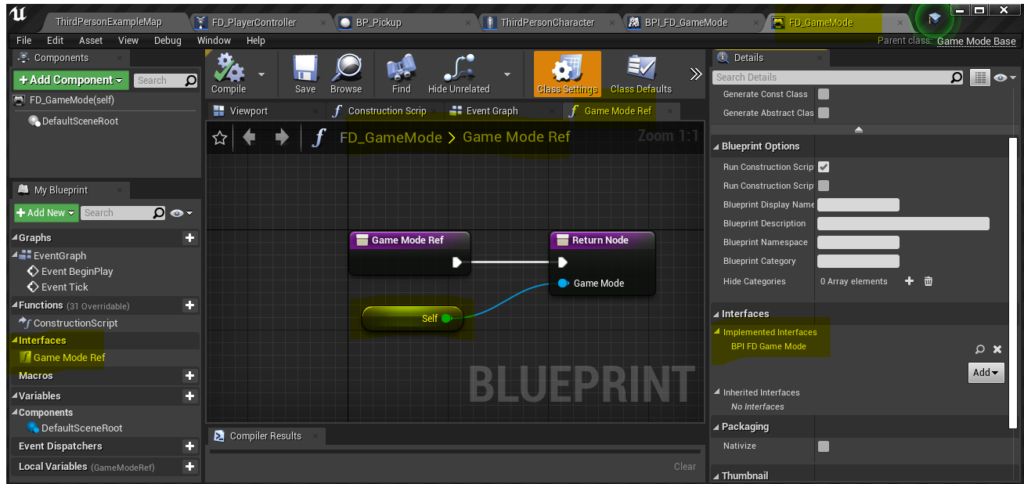
Step 1 : Create Gamemode, Create Interface, Create reference to Gamemode.
Set your GameMode in your level.

Note : If you are following along with the different parts, you already made the gamemode at step 1 of part 6

create gamemode and interface
GameMode reference in interface
Connect Interface to GameMode and build Ref function
Set your GameMode in your Level. Set Default Pawn Class and PlayerControllerClass

I want to store the playerinfo of each connected player in the gamemode and want te be able to print all connected players to all clients. The GameMode knows which players are connected.
The problem is that the menu (widget) lives only on the clients and the gamemode lives only on the server. So I use the PlayerController (lives on both server and client) to communicatie between menu and gamemode.

Step 2 Blueprints GameMode
Add PrintConnectedPlayersGM to interface gamemode.
Add Event OnpostLogin in gamemode. Create var Connected Players.
Create array ConnectedPlayersInfo and fill with playerinfo of each connected controller.
Add Event OnLogout.
Add Event PrintConnectedPlayersGM which will print the player info on server and clients.

Add function PrintConnectedPlayersGM to interface gamemode
OnPostLogin add player to array
Fill array with playerinfo of each connected player controller.

Note: The ConnectedPlayers array is of type : Player Controller Object references! Turns out this is not my FD_PlayerController that is why you see the Cast to FD_PlayerController node.

Note: In part 6, step 3 the PlayerInfo from the GameInstance is copied to the PlayerController.

Event OnLogout
Event PrintConnectedPlayersGM

Note: PrintConnectedPlayersPC (prints on the clients) is discussed in the next step 3. player

Step 3 : Blueprints PlayerController
Event PrintConnectedPlayersPC (runs on Owning Client) prints the playerinfo of all connected players on the owning client
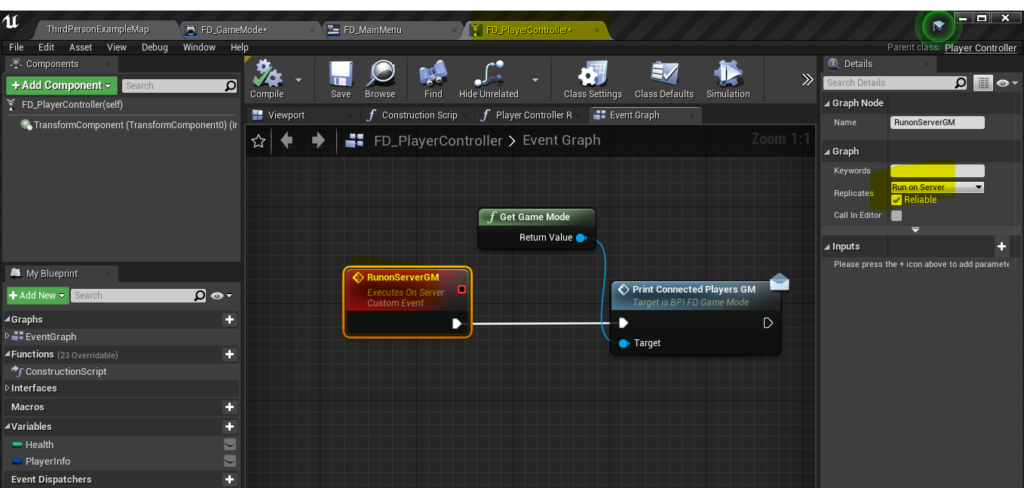
Event RunonServerGM (Run on server) which calls the PrintConnectedPlayersGM which is defined on the GameMode

Event PrintConnectedPlayersPC, which is called on the gamemode
Run PrintConnectedPlayersGM on Gamemode

Step 4 : MainMenu
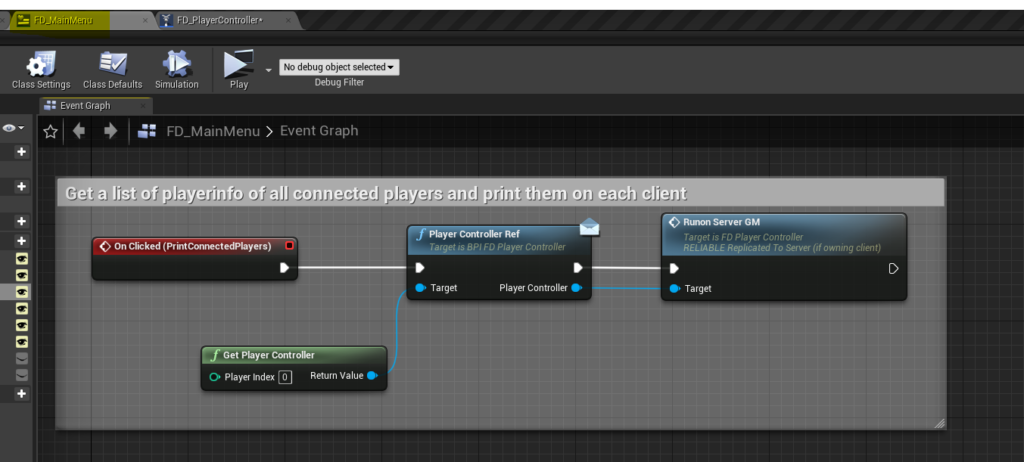
Add button PrintConnectedPlayers to menu

Add button to menu (designer)
Run RunonServerGM on PlayerController

Video showing the result step 1 to 4

Share Button

Part 5 : Replicate Variables

Back to main post

I am going to check and rebuild this video. How to replicate variables.
It is really for dummies, can’t get simpler :-).

Because I want to understand Dedicated Server, I am only going to run from the client

Variable Replication

My final conclusion is that the video above is not correct. Only the Server and the Client connected by the character can replicate variables!

Official documentation https://docs.unrealengine.com/en-US/Resources/ContentExamples/Networking/index.html

Second video

https://www.youtube.com/watch?v=QgQDvljM2fM&feature=emb_logo

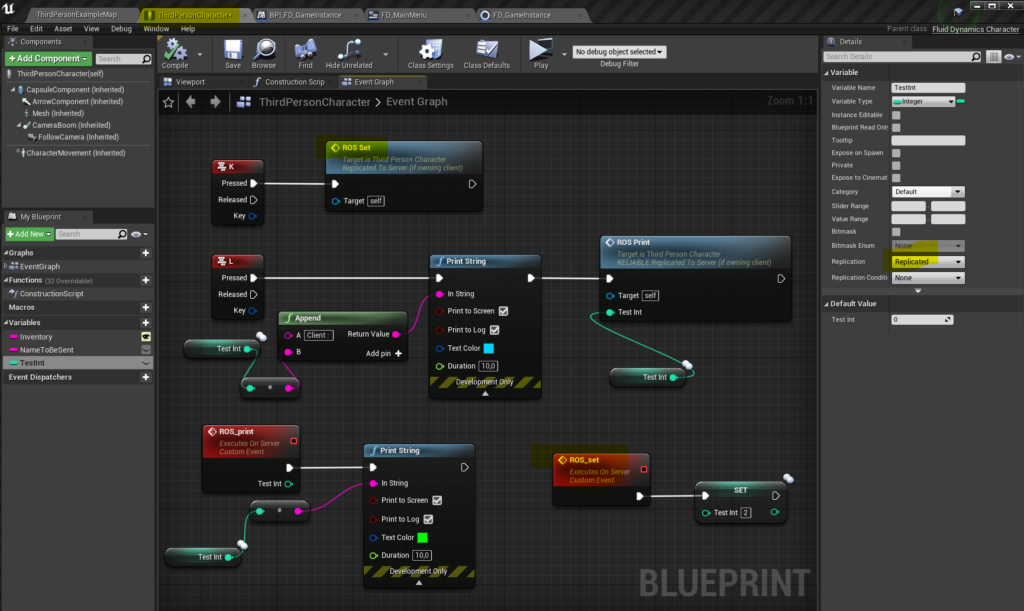
Step 0 Build the blueprints from the first video

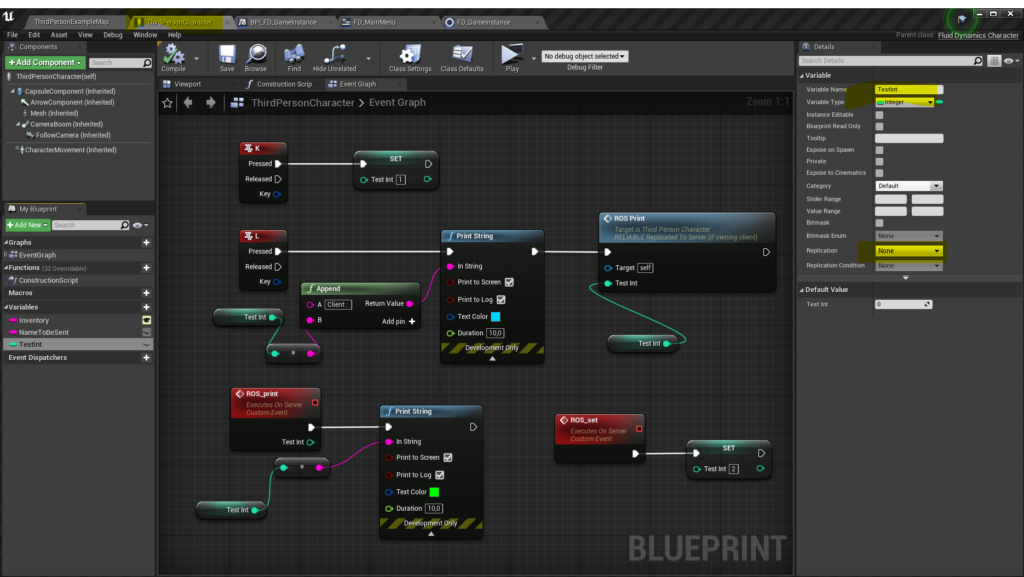
I used key’s K and L

Blueprints

Step 1 No Replication, variable is set on client

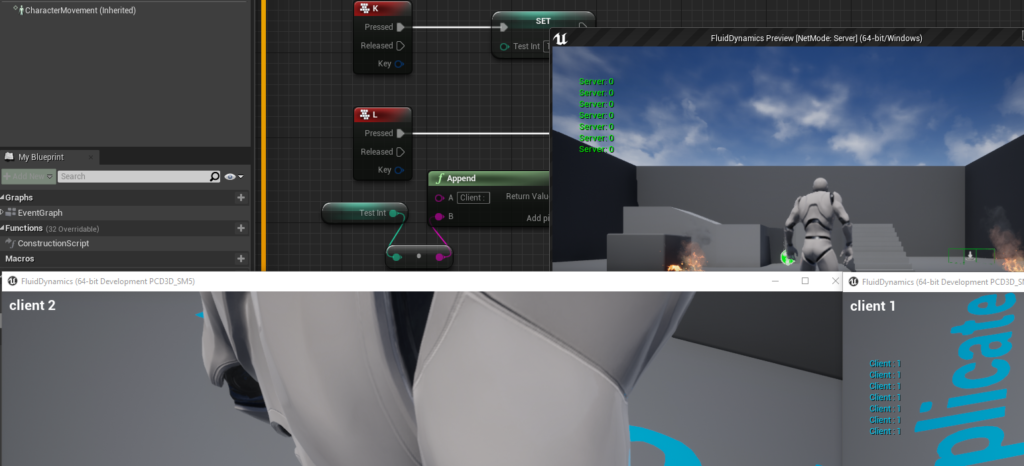
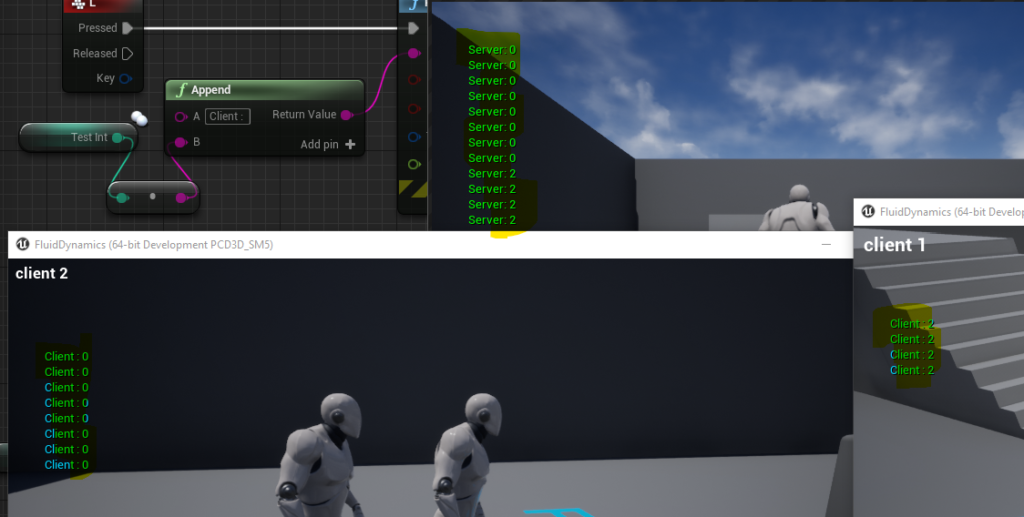
I hit K and L on client 1. So in Client 2 there is nothing happening. And the integer is not changed on the server

Step 2 Replication is enabled, variable is set on client

Nothing changes because replication on a client does not do anything

Step 3 Replication is enabled, variable is set on server

Blueprint

Variable changes on Client 1 and Server, but not on Client 2. I have to hit K on client 2 to get it changed on client 2. So in this setup the variable is not changed on the other client. This because only Server and client 1 are connected through the character, when I hit the key on Client 1

When asked I asked for a reaction in Unreal Slackers, I got the following answers:

Replicated variables only update when set on server. Setting them locally will change them until the next replication consideration, where they’ll get corrected back to server value

You have two instances of that character. When you press l, you are checking that characters instance.

The variable is not global but is on each instance of thirdperson character. So it changes only for that character pawn, but it does so on both server and client. The thing is, each client is controlling a different thirdpersoncharacter with its own instance of that variable

All three views (server, client1, client2) see 2 characters. Your local input only goes to the locally controlled character.

If you want a variable that is not specific to each instance of the actor but rather is shared across the whole game session for everyone then it is better to put it in a central location like the Game State

Second video

https://www.youtube.com/watch?v=QgQDvljM2fM&feature=emb_logo

Step 4

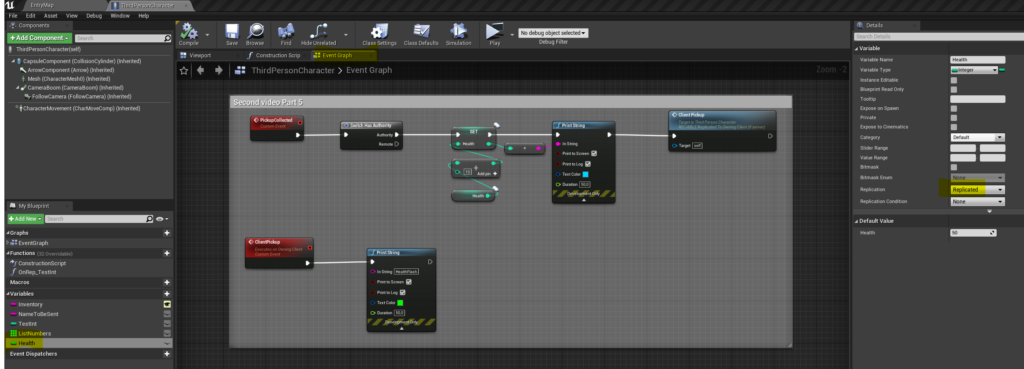
BP in Character

So it turns out that you can use a “Run on owning client” event together with a “run on server” event!

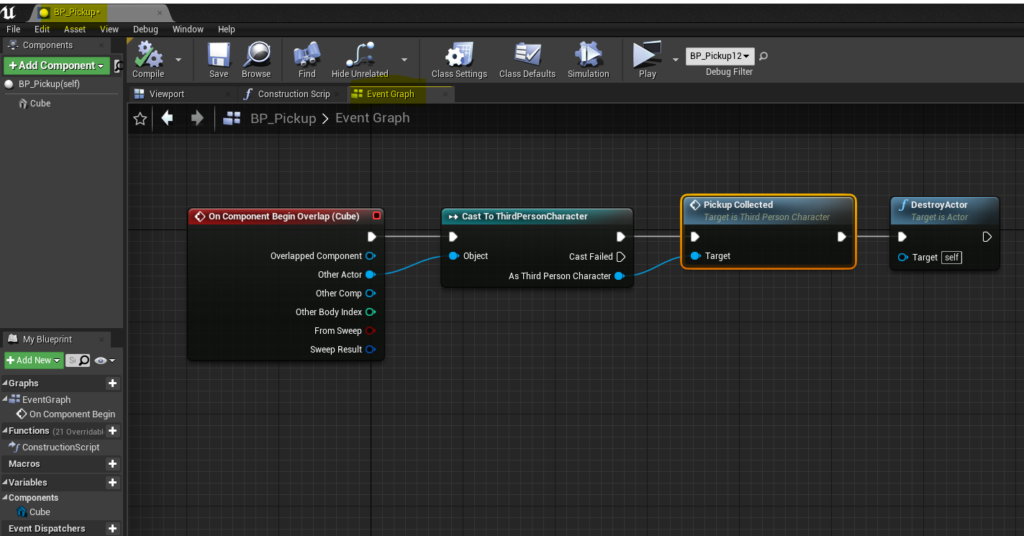
BP Pickup. In this I did not make an interface, but just used casting

Video discussing the result.

So actually I am not 100% happy with the result. I want the server to know the name of the client and the health should be printed at the client.

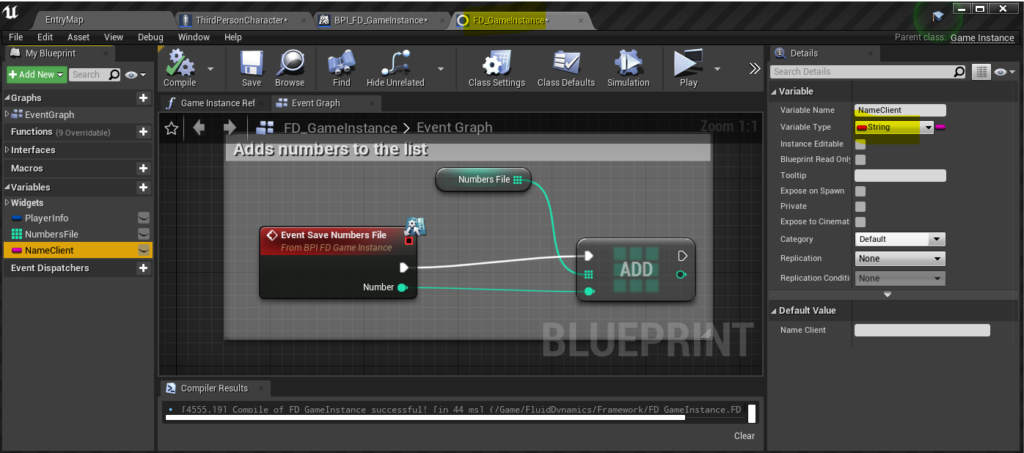
Step 5 Make save namefunction on Interface and on Gameinstance

SaveNameClient on Gameinstance
Store NameClient on Gameinstance

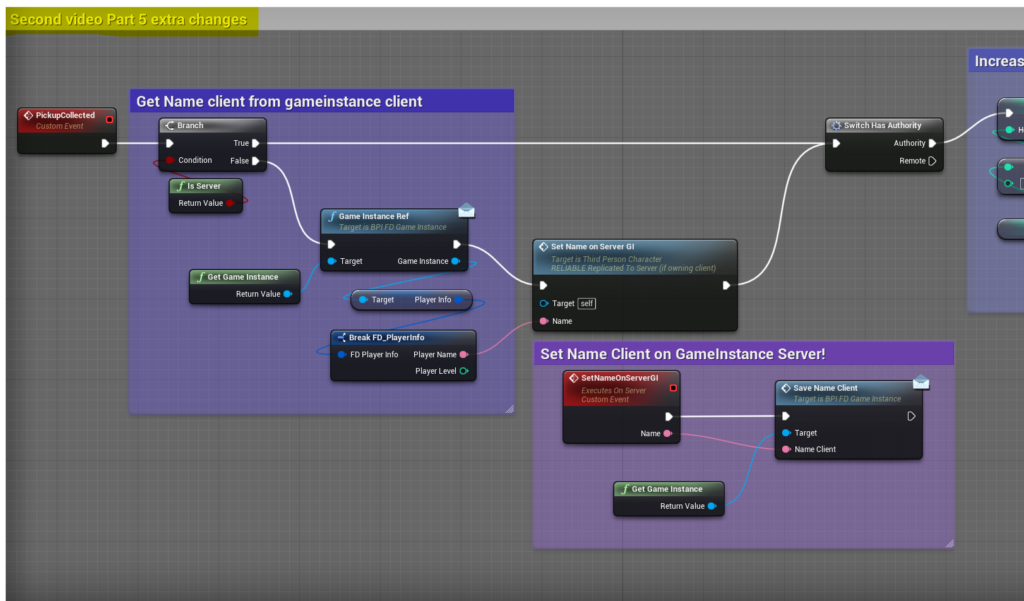
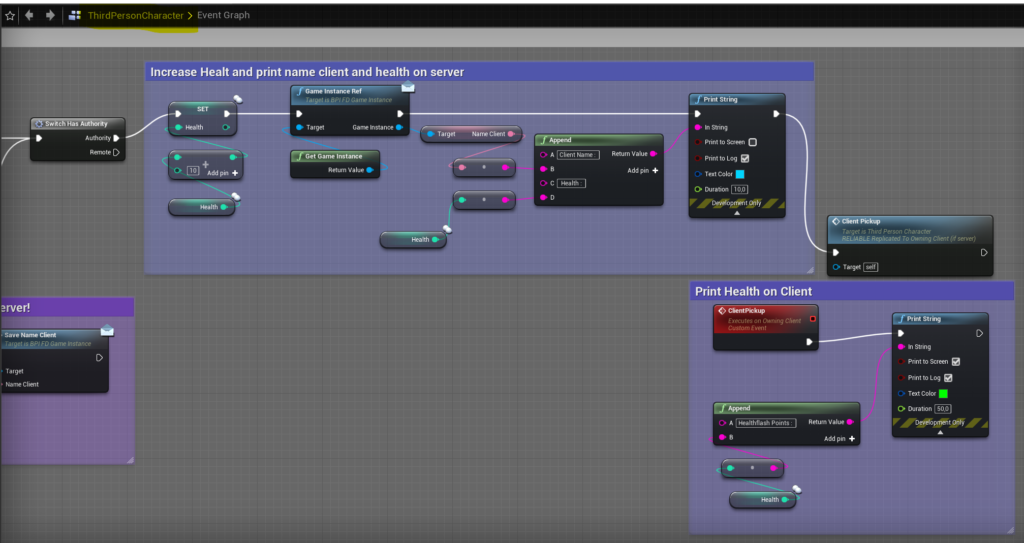
Step 6 Change Blueprint Character

Blueprints part 1
Blueprints part 2

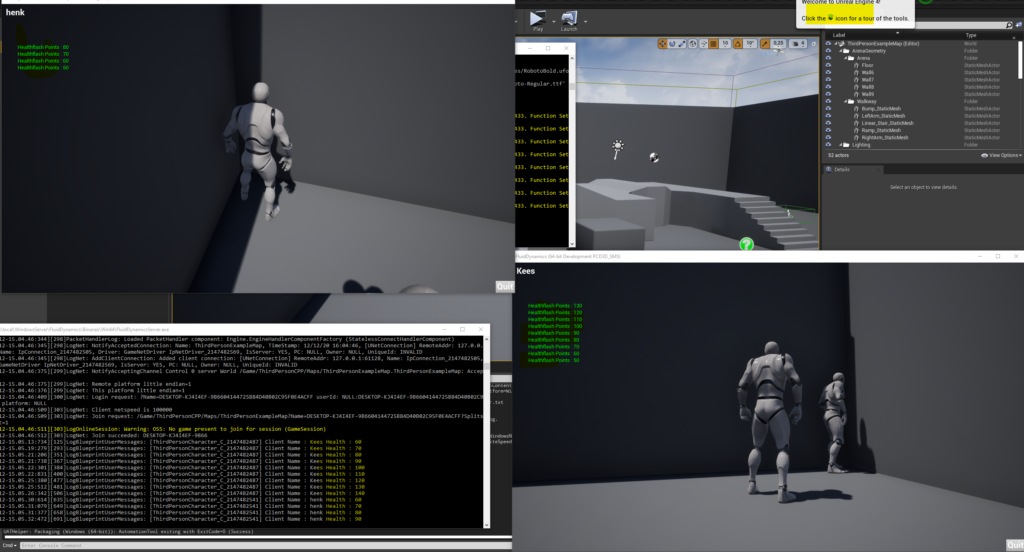
Result step 5 and 6

Result step 5 and 6
Share Button

Part 6 : Playercontroller

Back to main post

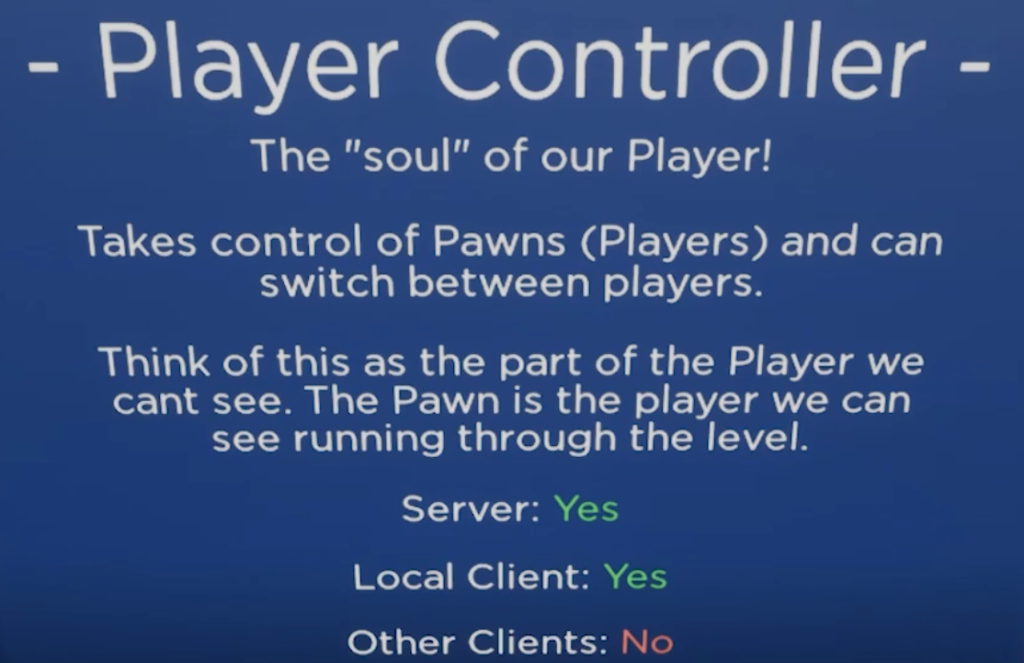
According to documentation : One PlayerController exists on each client per player on that machine. These are replicated between the server and the associated client, but are not replicated to other clients, resulting in the server having PlayerControllers for every player, but local clients having only the PlayerControllers for their local players. PlayerControllers exist while the client is connected, and are associated with Pawns, but are not destroyed and respawned like Pawns often are. They are well-suited to communicating information between clients and servers without replicating this information to other clients, such as the server telling the client to ping its minimap in response to a game event that only that player detects.

https://docs.unrealengine.com/en-US/API/Runtime/Engine/GameFramework/APlayerController/index.html

So it is better to use the playercontroller instead of the character for accessing client and server?

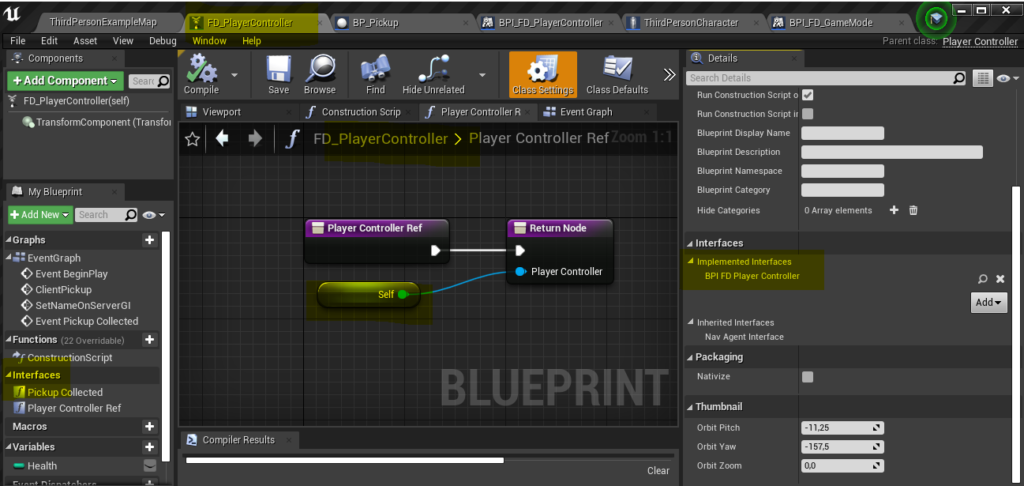
Step 1 : Create Playercontroller, create interface and create reference to Playercontroller.
Note: Actually I also created the gamemode (see Part 7). I set the new gamemode for my level. So also as step 1 als take a look at step 1 of part 7. 🙂

Create PlayerController and interface

Player Controller reference in interface
Connect interface to controller and build Ref function
Set your GameMode in your Level. Set Default Pawn Class and PlayerControllerClass.

Step 2 : Move blueprints from character to playercontroller

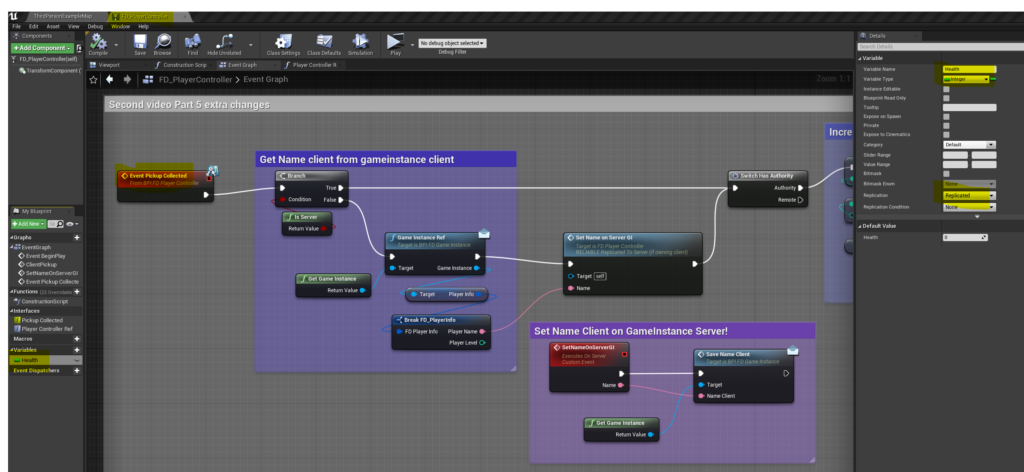
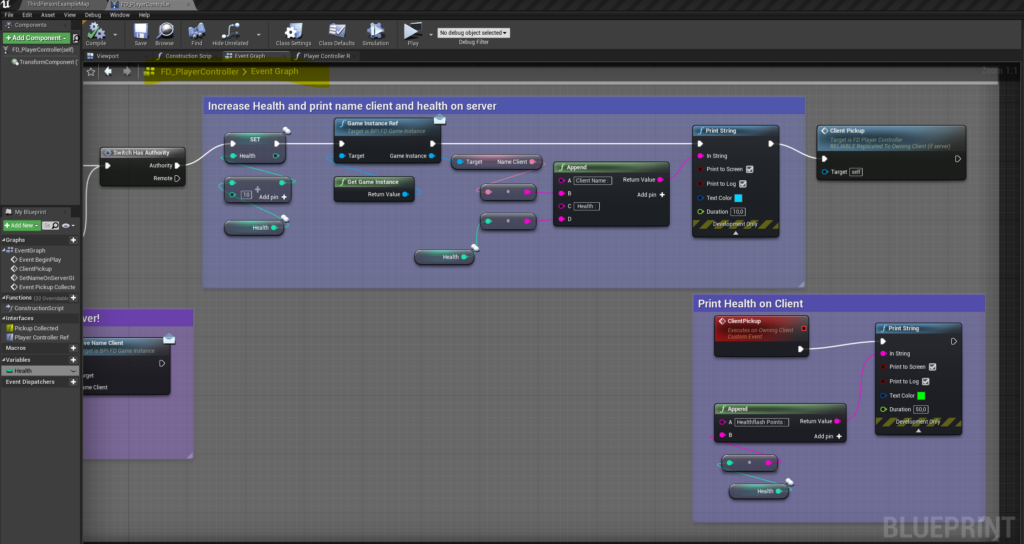
I am going to move the “Second video Part 5 extra changes” from the character to the player controller. This is just an exercise, I could argue that the best location for these Blueprints is actually the character.

So I moved the blueprints from the character to the playercontroller. I had to do some recompiling/ rebuilding. And I had to connect to Blueprints to the interface “Event Pickup Collected”. Also add the variable Healh which should be replicated.

PickupCollected in Interface
Blueprints in playercontroller part 1
Blueprints in playercontroller part 2

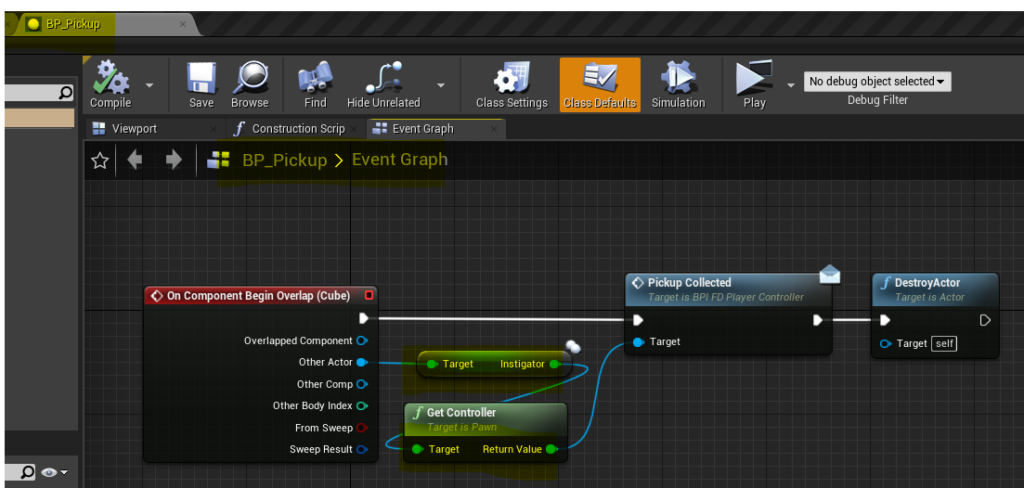
Actually the biggest change was in the BP_Pickup. On overlap, the character (pawn) is given. It is the playercontroller of the character that you need. This can by achieved by using the Get Controller function. Also the Pickup Collected interface function had to be added.

Blueprint in BP_Pickup

Video result step 1 en 2

Video step 1 and 2

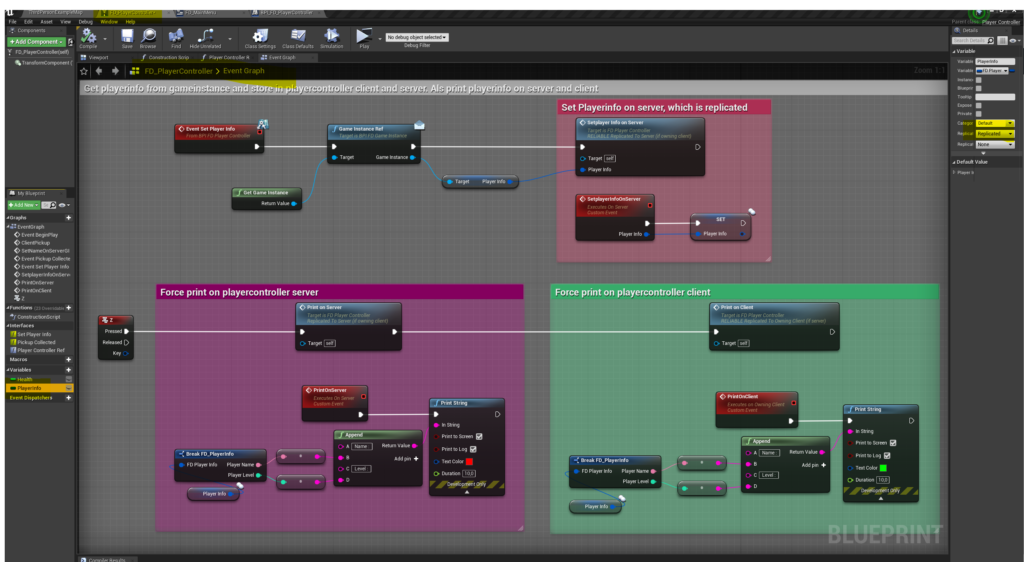
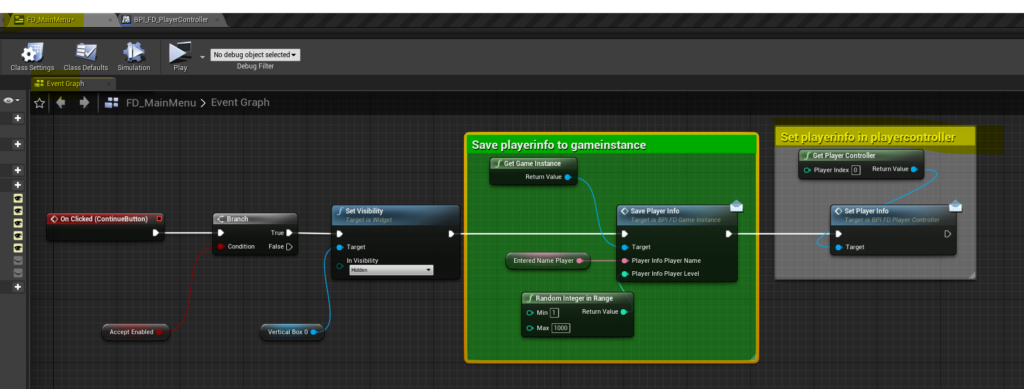
After entering the name in the menu. Get the playerinfo from the gameinstance and store it in the playercontroller on both client and server.

Step 3 Make SetplayerInfo in interface playercontroller.

Setplayerinfo in interface
Blueprints in Playercontroller, Var PlayerInfo added (replicated)
Blueprint in widget MainMenu

Result in Dedicated Server

Result step 3
Share Button

Part 4 : Gameinstance

Back to main post

According to the documentation : The GameInstance exists for the duration of the engine’s session, meaning that it is created when the engine starts up and not destroyed or replaced until the engine shuts down. A separate GameInstance exists on the server and on each client, and these instances do not communicate with each other. Because the GameInstance exists outside of the game session and is the only game structure that exists across level loads, it is a good place to store certain types of persistent data, such as lifetime player statistics (e.g. total number of games won), account information (e.g. locked/unlocked status of special items), or even a list of maps to rotate through in a competitive game like Unreal Tournament.

Step 1: Create a Blueprint GameInstance and BP Interface

Create Gameinstance and Interface
This image has an empty alt attribute; its file name is image-6.png
In Project Settings, Maps en Modes set Gameinstance

Step 2: Connect Interface to Gameinstance and make Reference

GameInstanceRef in Interface
Connect Interface in GameInstance
Game Instance Ref

Step 3 : Create Blueprint Widget and add Show MainMenu in Interface

Create Blueprint Widget

ShowMainMenu in Interface

Step 4 : Building the Widget

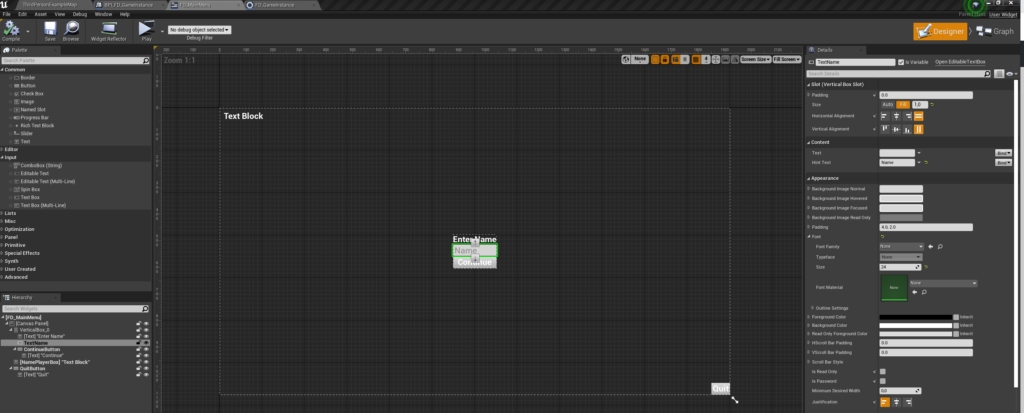
Designer Widget
Graph Widget

Step 5 : Event Show Main Menu in GameInstance

Add Variable MainMenuWB in GameInstance
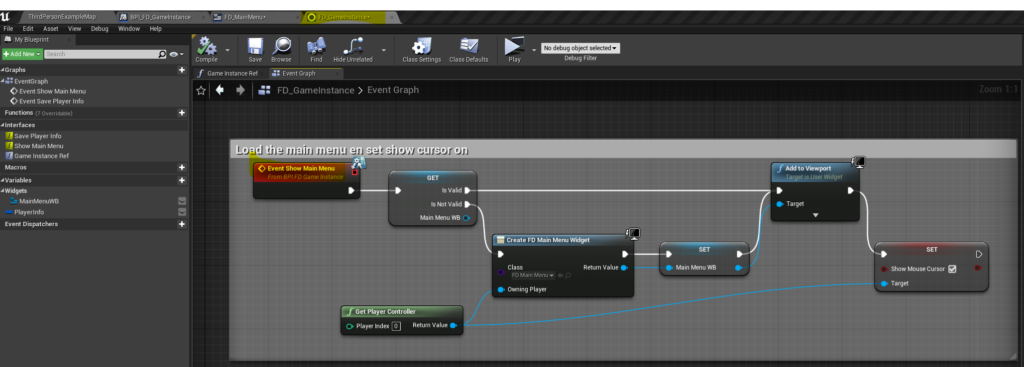
Event Show Main Menu in Gameinstance

Step 6 : Open main menu from level blueprint

Level BluePrint

Video step 1 to 6

In the following video I forgot to show that in Project Settings, Maps en Modes, the Game Instance class is set to your created Gameinstance!!

Explaining first 6 steps

Previous steps are preparation for the real thing 🙂

Step 7 Create PlayerInfo Struct, Add to Interface, Store in GameInstance

Struct FD_PlayerInfo
SavePlayerInfo in Interface
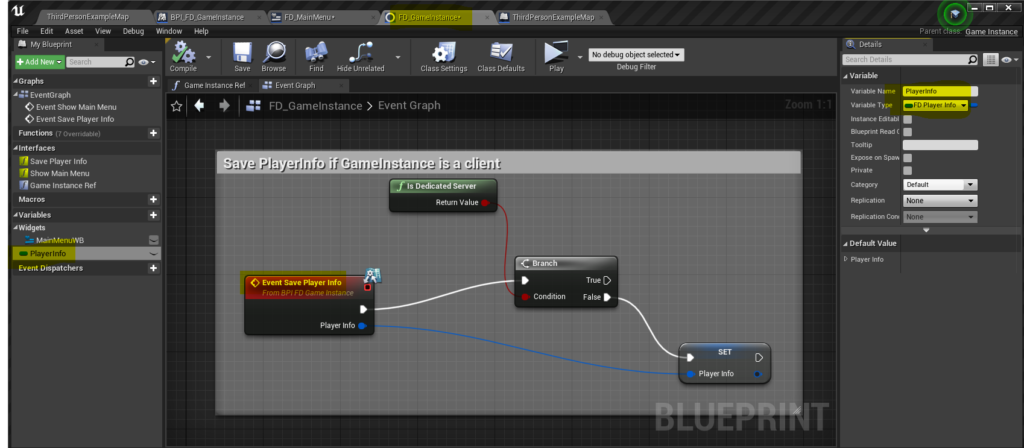
In GameInstance add variable PlayerInfo and Event SavePlayerInfo

Step 8 Store to PlayerInfo in Menu. Event M to print PlayerInfo

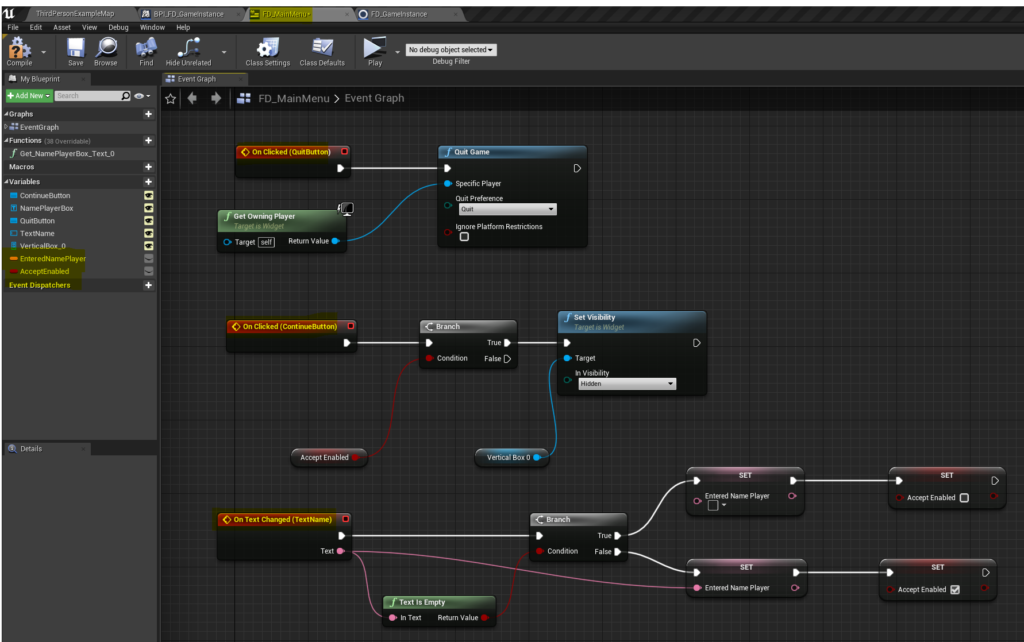
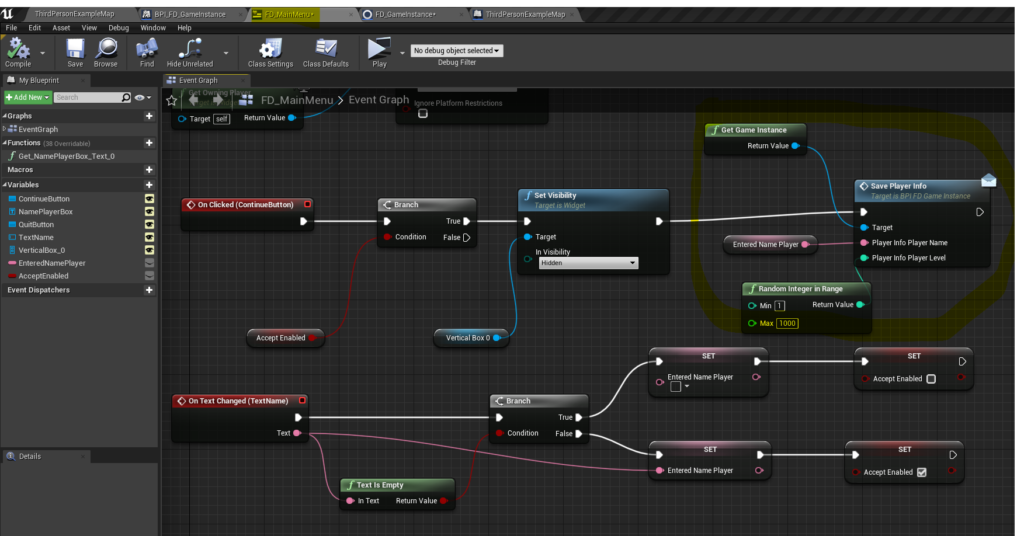
In MainMenu store PlayerInfo to GameInstance
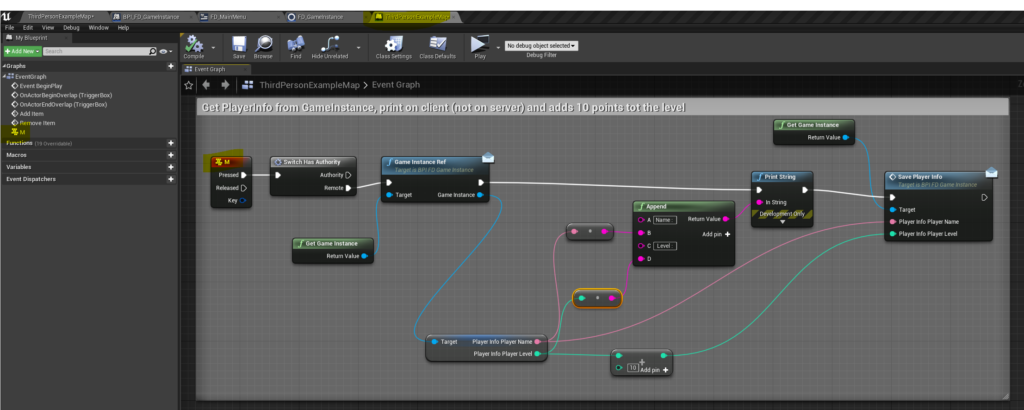
Event Key M in Level Blueprint

Video step 7 and 8

Step 7 and 8

Wrap up Part 4

Wrap Up Part 4

Extra

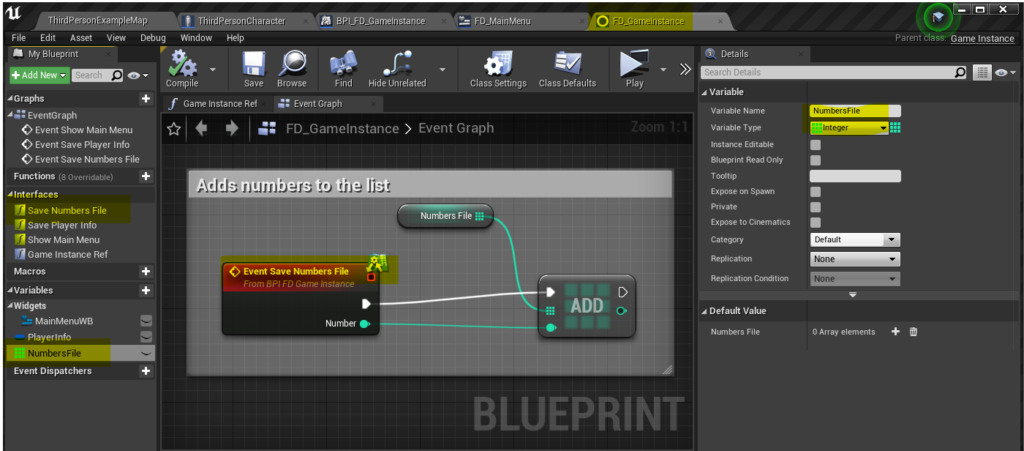
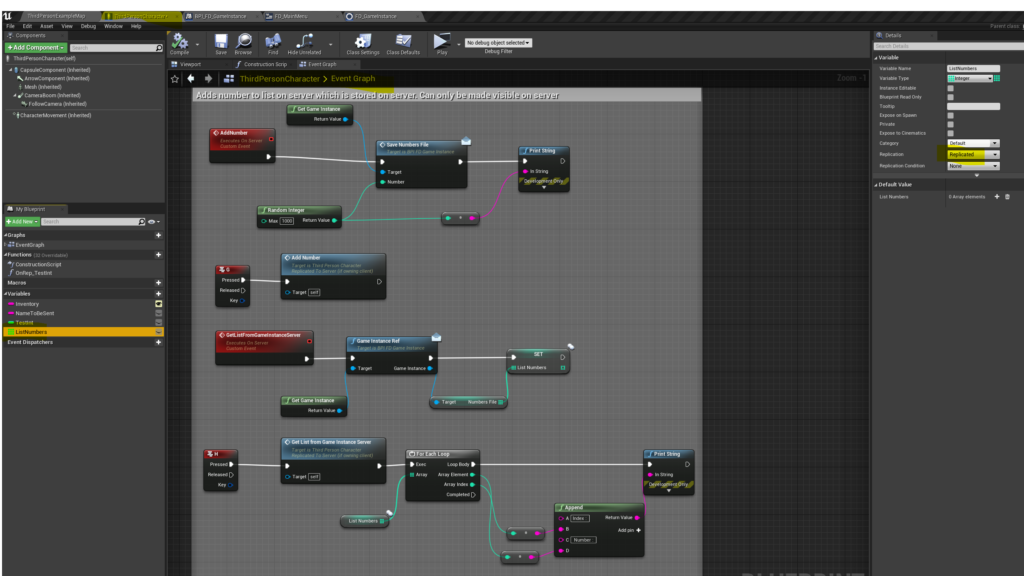
I have added another part, where on the Gameinstance al list of numbers is stored. This list is filled by the clients. In this case I used the character for getting access to the gameinstance of the server

Keys : G and H

Interface
GameInstance
Character

Result

Video with result extra

Share Button

Part 3 Replicating functions

Back to main post

https://docs.unrealengine.com/en-US/Gameplay/HowTo/Networking/ReplicateFunction/Blueprints/index.html

Note: In the documentation the blueprints are changed with the different steps. I am building new versions each time:

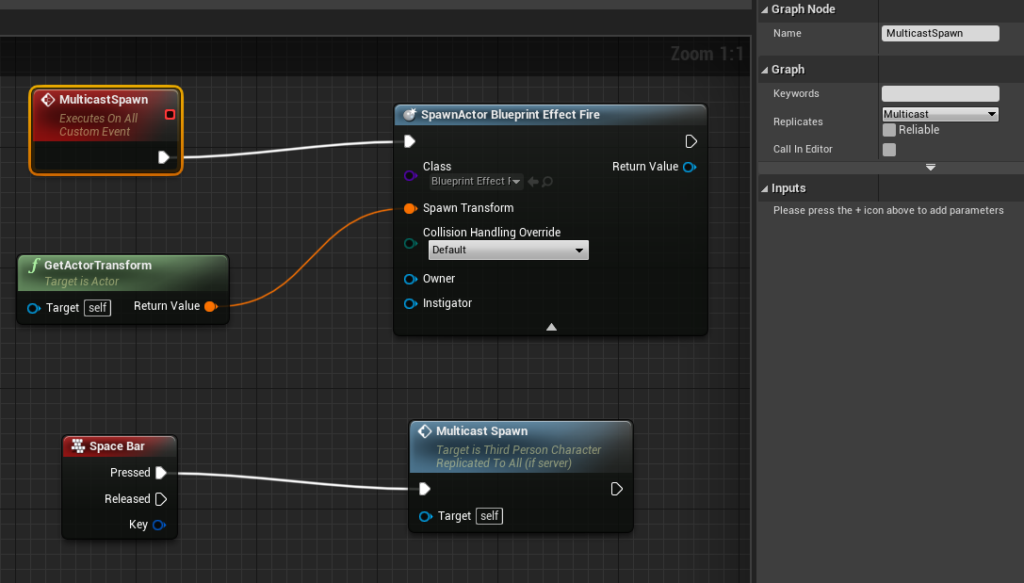
Space bar = MulticastSpawn
p = Run on Server
o = Run on owning client

Note: In this example the blueprints ar build in the character. The character lives both on the server and the client. So that is why, a function can by activated on the server by an action on the client.

From the documentation: Pawns (including Characters) will also exist on the server and on all clients, and can contain replicated variables and events. The decision of whether to use the PlayerController, the PlayerState, or the Pawn for a certain variable or event will depend on the situation, but the main thing to keep in mind is that the PlayerController and PlayerState will persist as long as the owning player stays connected to the game and the game doesn’t load a new level, whereas a Pawn may not. For example, if a Pawn dies during gameplay, it will usually be destroyed and replaced with a new Pawn, while the PlayerController and PlayerState will continue to exist and will be associated with the new Pawn once it finishes spawning. The Pawn’s health, therefore, would be stored on the Pawn itself, since that is specific to the actual instance of the Pawn and should be reset when the Pawn is replaced with a new one.

So it is better to use Playercontroller?

Step 1 Multicast (Spacebar)

The multicast only spawns to the clients if it is activated on the server.
So on a dedicated server how to activate this function?

Step 12. Graph shown is on the character

Step 2 Run on Server (key p)

Works on the Dedicated Server (local). Important that spawn actor is set on replication!

Activate fire on client and show on al clients. Graph shown is on the Character

Run on Server in combination with replicate is an important option with dedicated server, because you only have acces to client. From the documentation: The core of the networking technology in UE4 is actor replication. An actor with its “Replicates” flag set to true will automatically be synchronized from the server to clients who are connected to that server. An important point to understand is that actors are only replicated from the server to the clients – it’s not possible to have an actor replicate from a client to the server. Of course, clients still need to be able to send data to the server, and they do this through replicated “Run on server” events.

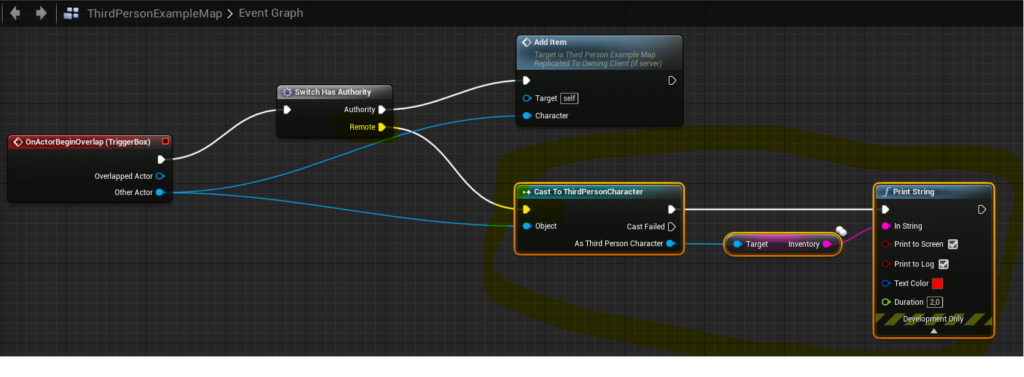
Stap 3 Run On Owning Client (key o to print inventory)

Explanation in my own words;

  • Character lives on both client and server
  • Variable Inventory lives on the character, so is accessible on both server and client
  • Triggerbox is in the level.
  • The character enters the triggerbox.
  • In the code (switch Authority) the events Add Item and Remove Item is only activated on the server. That is why when using a dedicated server the print string (in events Add Item and Remove Item) does not show. With a dedicated server only the clients have an graphical Interface.
WrapUp Part 3 video

I tried to get the Inventory printed on the client, from the level blueprint of the level.
This by connecting a print event to the Remote pin of switch has Authority.

Trying to print on the client

Text is printed on all clients. And it is the wrong text. So it looks like all clients are connected to the remote pin on the switch. Although it is a specific character which enters the triggerbox? To be continued.

Share Button

Part 2 Actor replication

Back to main post

According to https://docs.unrealengine.com/en-US/Gameplay/Networking/Actors/index.html

Step 1 Replicating Actors in Blueprints

I have added the startercontent to the project.

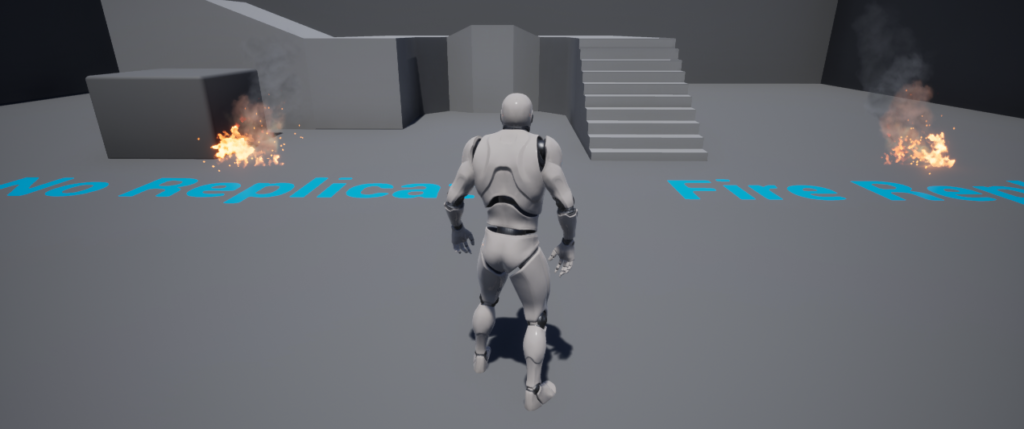
After the first part I started the dedicated server (local) and of course the not replicated fire is not showing. This because the dedicated server has no graphical interface.

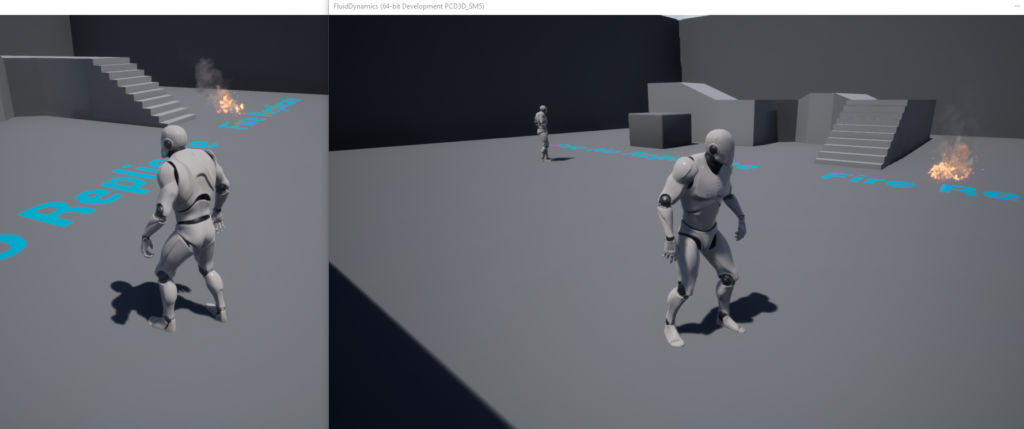
But if I set the Net load on Client as checked in the Fire_NoReplicate, it will also be visible on the client! So at this point I don’t see the difference 🙂

Second part of the instructions Dynamically Spawning Replicated Actors

If we look at step 14. If I run it on the dedicated server. With a dedicated server, the No replicate part is no use, because the server has no grapical interface?

Client in dedicated server


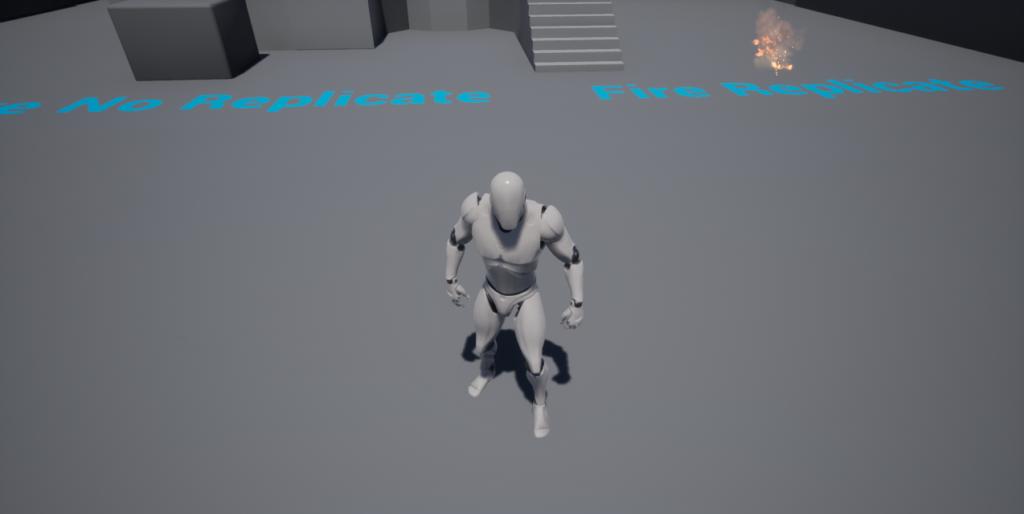
If we look at step 4. Bought fires show up on the client

Client with dedicated server

Step 2 Replicating Variables in Blueprints

https://docs.unrealengine.com/en-US/Gameplay/HowTo/Networking/ReplicateVariable/Blueprints/index.html

Instead of fire I used the Spark_Effect

I set the countdown variable to 100

Result after step 25 I got a problem. If a run the simulated server (2 clients) in the editor, no problem. But after packaging and starting the local server, this appears, over and over. I can start the client but stil this is wrong.

Warning in server log

So it looks like the progam is try to read the value of Textrender, while it has no value yet or is not create yet? If I don’t use event tick, there is now problem.

Warnings Tick on Dedicated Server

Turns out to be a typical Dedicates Server error. Problem is that the dedicated server does not have a graphical interface!!!! So it can’t deal with the textrender, there is no textrender on the server!!!!

RepNotify

Warp up and some solution to the problem 🙂 Stil not solved completely

Wrap Up part 2

Problem solved

After the counter is back to 0, the timer still keeps on running because it is set on looping! De timer is only running on the server. So the timer should be cleared!
This is done in the On Rep Deactivate.

Clear Timer in On Rep Deactivate

Share Button

Part 1 Building the basic model

Back to main post

Step 0 Having a dedicated server
It really is necessary to test on a dedicated server. Several times I did a test in the editor, but when I tested on a real dedicated server other things happened.

Some possibilities
1. Run a local dedicated server on your computer (local host).
This is most of the time my starting point.
2. Get access to a server of you company. I have access to a windows server of my university
3. Get a VPS form a commercial company for example Strato V20 .  They are not that expensive. Choose a windows VPS. With linux you have to do a lot of extra compiling. I am not covering this.

You can use “Remote Desktop Connection” to connect to your VPS. This really is great. You are seeing and using windows on your VPS.
For example run CMD and ipconfig on your VPS to check the address of your server.

The unreal engine server needs port 7777 to communicate.
First you have open port 7777 in the firewall of your server
On your server, using your Remote Desktop Connection, search for
“Windows Defender Firewall with Advanced Security”
Add Inbound Rules and Outbound Rules for TCP 7777 en UDP 7777 ports.
Note: I am not sure if both TCP and UDP are necessary.
Note : Without the UDP port it won’t work!

Second: You also have to open the ports in de system of you provider which is controlling the VPS!
This is different for each provider. Strato has a tool called PLESK. You have to search for security and rules. If you don’t open port 7777 in this system, it won’t work.
Note: You have to reboot your VPS server to get the changes working

Note: You also have Gamelift and SpatialOS and others as very high end dedicated servers. I am going to start simple. In this tutorial maybe I will switch to SpatialOS.

Step 1 Building from source
Build UE 4.25.3. from source I used Visual Studio 2019!!
Make a C++ ThirdPersonProject
From part 5 I switched to 4.26.0

Step 2 Build the basic model according to https://docs.unrealengine.com/en-US/Gameplay/Networking/HowTo/DedicatedServers/index.html

Note: In the article the folder Maps from ThirdPersonCPP was moved to content. That did not work for me (got problems with packaging). So I did not moved the folder

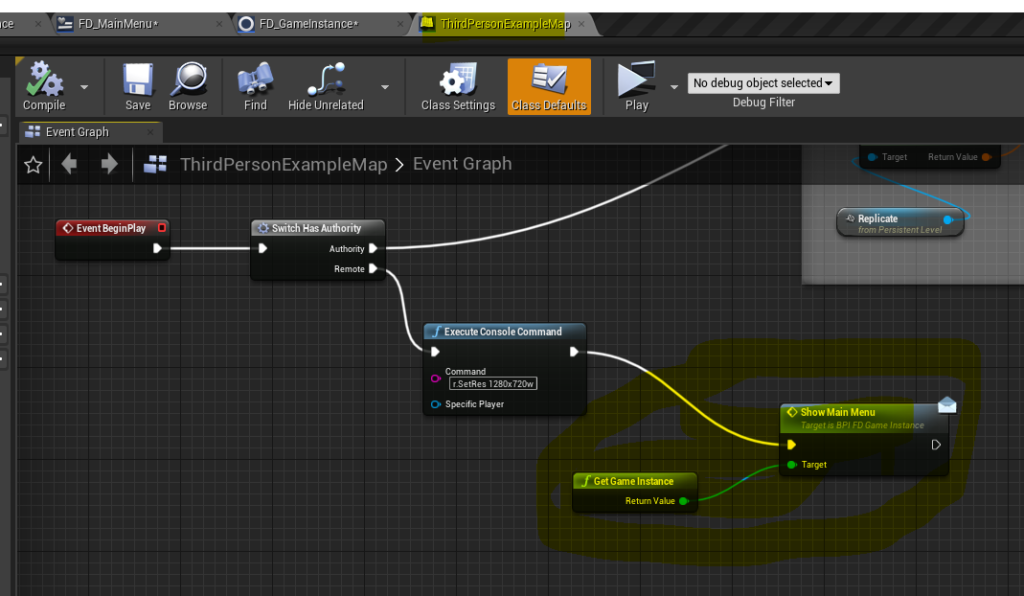
Step 3 To prevent to game to start fullscreen I added the next Blueprint to the Level Blueprint of the ThirdPersonExampleMap.

Smaller screen size

Step 4 Added a local Level with my server address

Connect to my server
Showcase dedicated server

Share Button

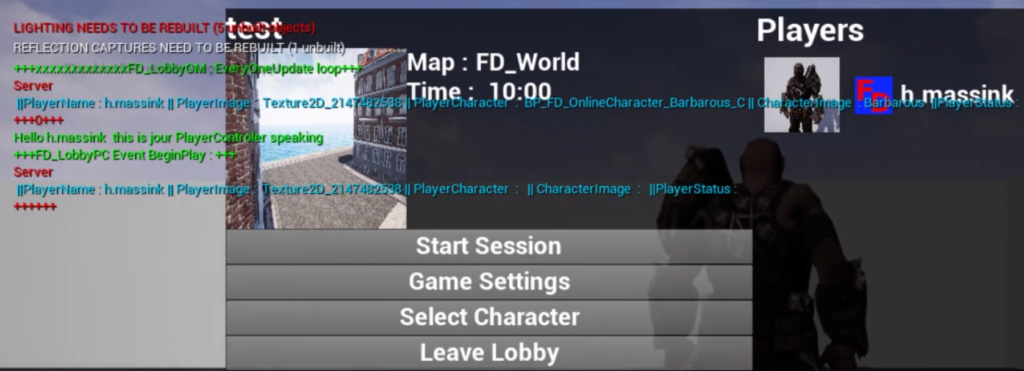
Breakdown : FD_PlayerInfo

PlayerName and PlayerImage are imported from Steam in FD_MainMenuPC

Video use for analysing problems https://vimeo.com/476355670/529aca5858

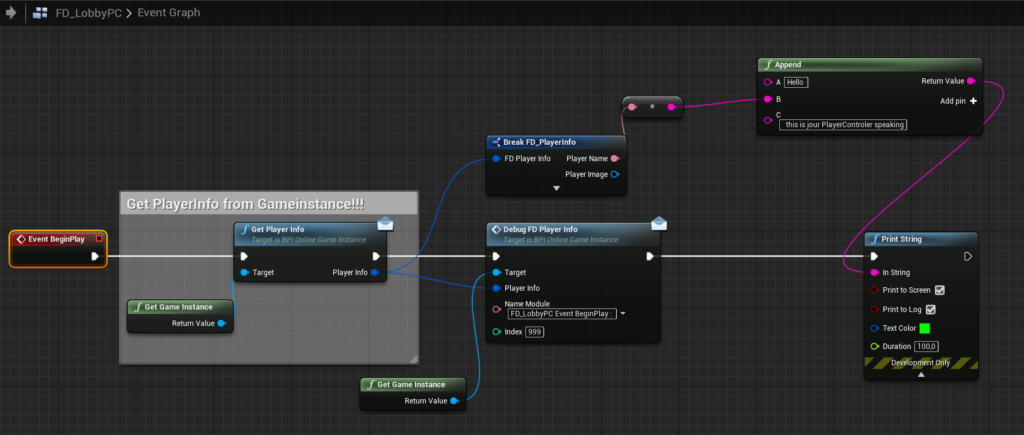
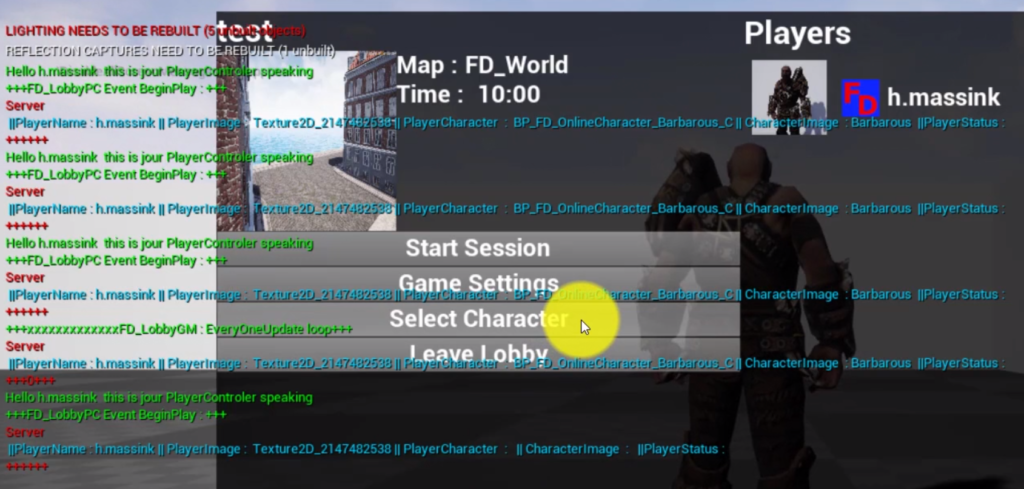
Event Debug FDPlayerInfo prints information to screen

Location of the debugfunktions used

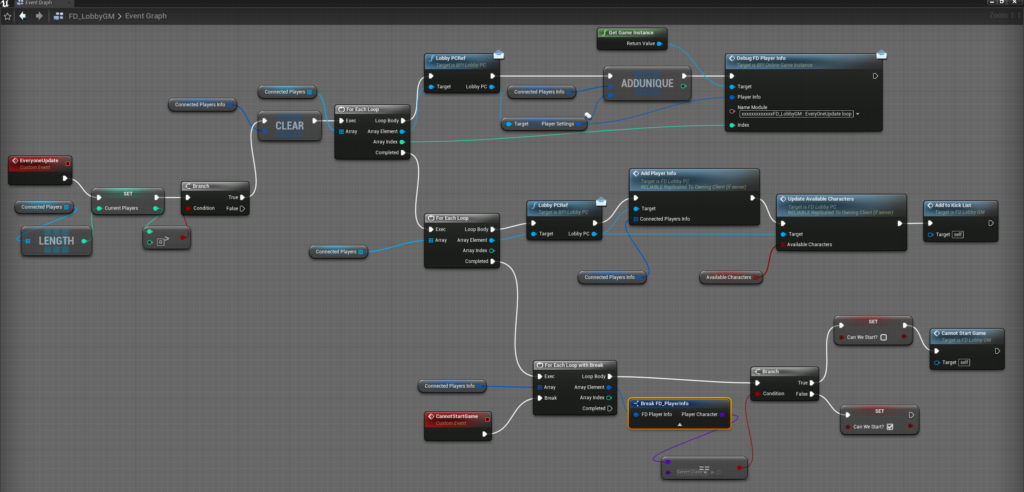
FD_LobbyGM EveryoneUpdate

FD_Lobby Event BeginPlay

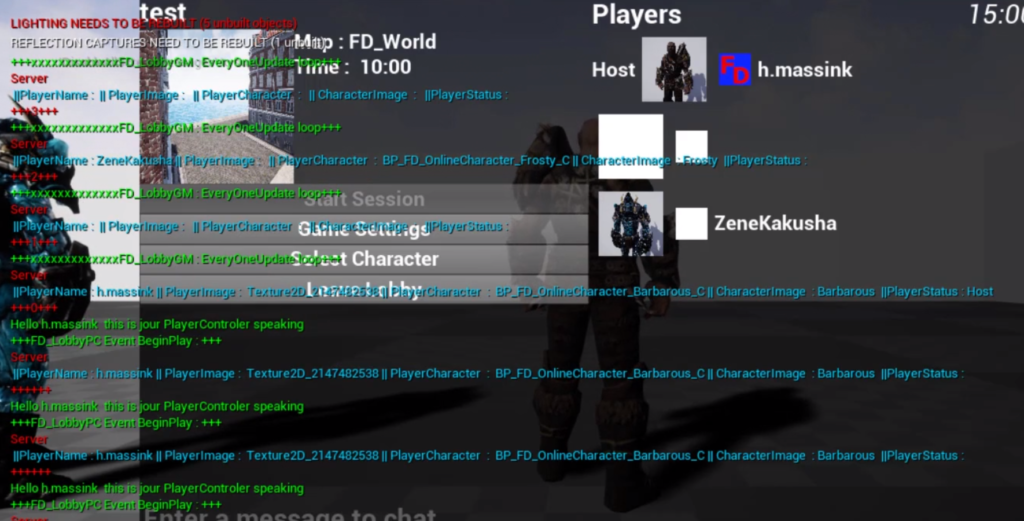
As Host:

0:15 Default setting as Barbarous.

When the others make first contact. FD_LobbyPC Event BeginPlay is called several times on the server. Time 0:39
This because a PlayerController lives on the server and the client?

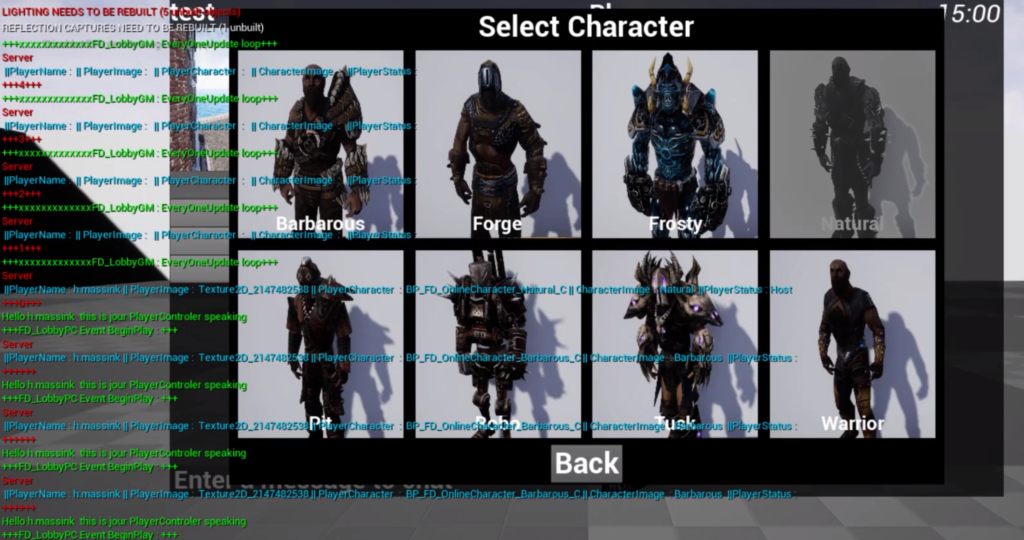
1:17 Host changes character to Natural . EveryoneUpdates runs with only info of the host. Server FD_LobbyGM knows that other are connected, but they have not selected a character yet. Natural is greyed out at al clients!

After each client selects a character it is grayed out, EveryoneUpdate loop runs on FD_LobbyGM on server, PlayerImage of clients is missing

1:42 Host select Barbarous. Players are displayed. PlayerImage is missing for clients.

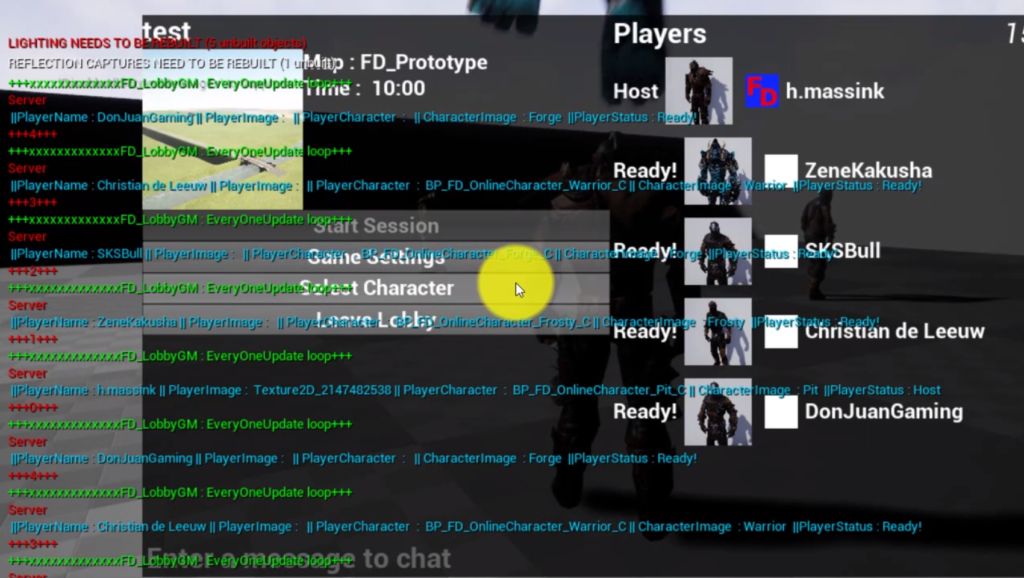
2:41 When ready or not ready is clicked the loop runs again on the server

Second run

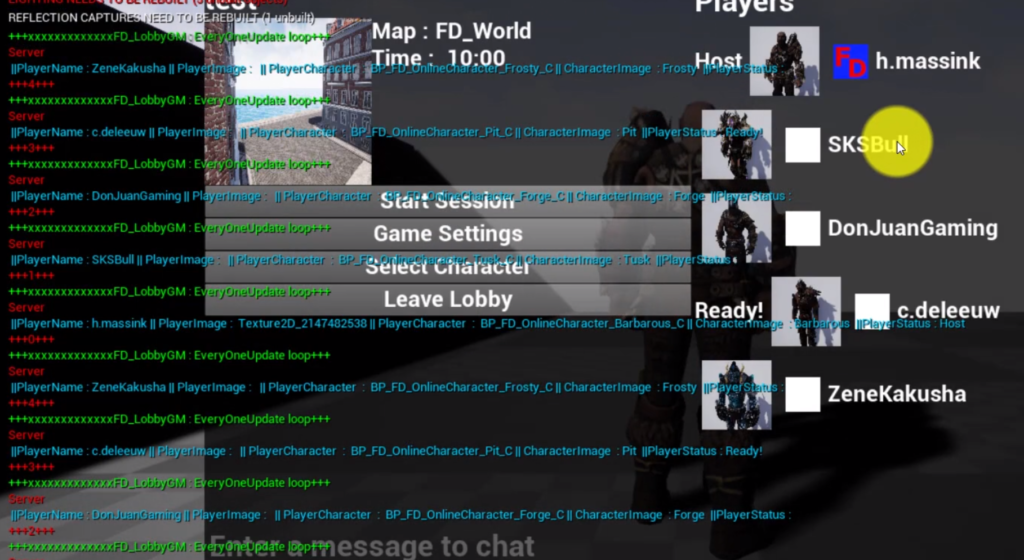
Clients started to select a character, while the character selection is not open on the server / host. One client appears without CharacterImage and name. Start Session is grayed out!! 6:15 After the client without characterimage and name quits, start session works again.

After rejoing, the start session is still grayed out. 8:42 . 8 players where allowed to join. If one of the clients changes character, it is ok again

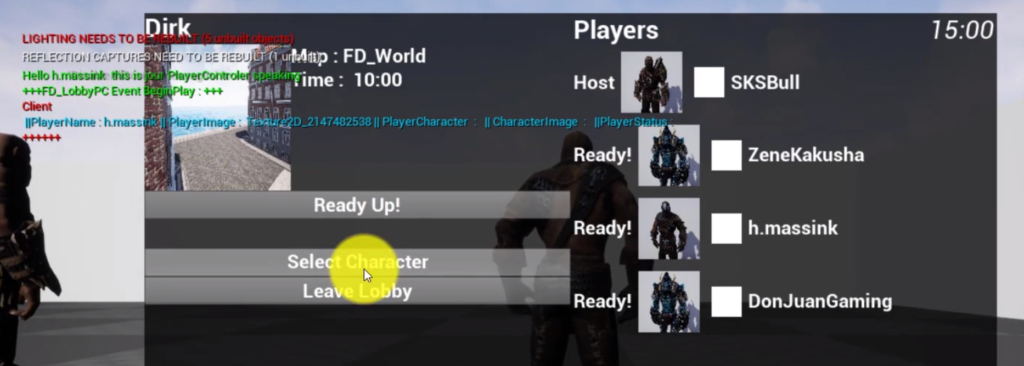
As Client

21:39 althoug the client knows it PlayerImage, it does no show up.

Share Button

Breakdown : Framework

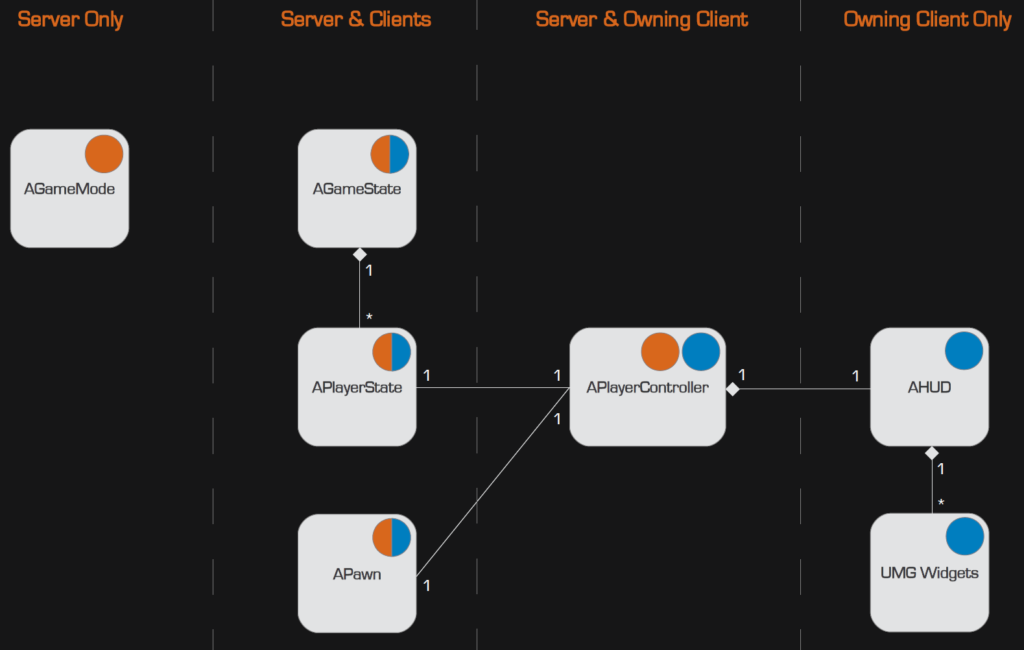
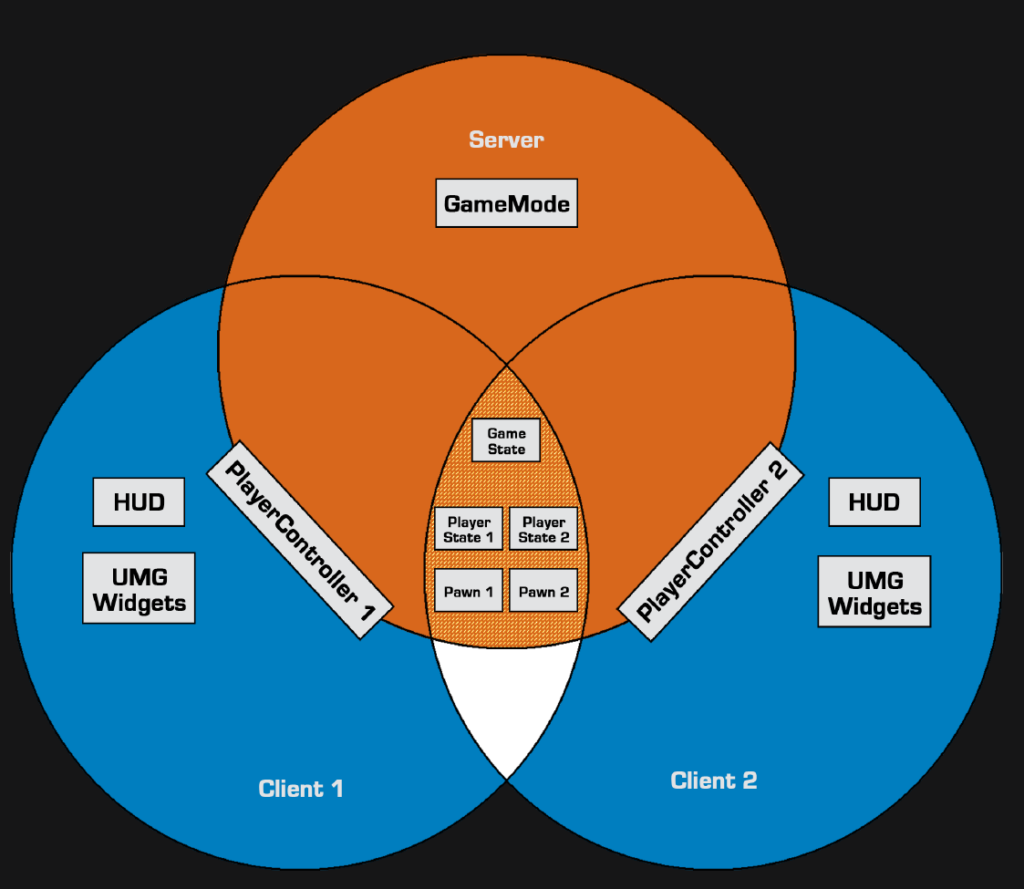
Based on Compendium Cedric Neukirchen

Example of Dedicated Server with 2 clients

From Reuben Wards course

  • Game Instance :
    Game instance created when game starts and lasts until that game executable closes, persisting across level changes and joining sessions etc.
    Game instance is only aware of its own executable. Does not have any connection between server and clients. Lives only on the client (is this correct?, also the server is an .exe)

In steam multiplayer of FD_Online:
BP_FD_OnlineGameInstance (Parent class = FD_OnlineGameInstance in C++)

  • Event Show Main Menu (Interface)
  • Event Show Host Menu (Interface)
  • Event Show Server Menu (Interface)
  • Event Show Options Menu (Interface)
  • Event Show Loading Screen (Interface)
  • Event Launch Lobby (Create Advanced Session and open FD_Lobby, as listen) (Interface) Setup Host as listen server
  • Event Join Server (Interface)
  • Event Save Player Info (Interface)
  • Event Main Menu Player Info (Interface)
  • Event Update Friends List (Interface)
  • Event NetworkError
  • Event TravelError
  • Event Destroy Session Caller (Interface)
  • Event Store Character Seleceted (Interface)

Several Gamemodes and PlayerControllers

Game and Server Default Map is FD_MainMenuMap . In level BP : Event BeginPlay sets resolution and starts Show Main Menu

FD_MainMenuGM has no content, is only used the get the FD_MainMenuPC activated

FD_MainMenuPC

  • Event BeginPlay
    Gets playername and image from Steam and also the friends

Map FD_Lobby has no Level BP. Starts FD_LobbyGM

FD_LobbyGM :

  • PlayerKicked
  • AddToKickList
  • Event OnLogout
  • StartLoadingScreen
  • LaunchGame (Actual start of the selected level)
  • ChangeCharacter

FD_LobbyPC:

  • InitialSetup (only on client)
  • LoadPlayerInfo
  • SavePlayerInfo
  • CallUpdate (only on server)
  • SetupLobbyMenu (only on client)
  • AddPlayerInfo (only on client)
  • UpdateLobbySettings (only on client)
  • ShowLoadingScreen (only on client)
  • UpdateNumberOfPlayers (only on client)
  • EventEndPlay
  • Kicked (only on client)
  • AddPlayerToKickWindow (only on client)
  • UpdateAvailableCharacters (only on client)
  • AssignSelectedCharacter (only on server)
  • AssignPlayer (only on server)
  • GetChatMessage (only on server)
  • UpdateChat (only on client)

Gamemaps like FD_World and FD_Prototype uses BP_FD_OnlineGM

At this moment BP_FD_OnlineGameStateBase and BP_FD_OnlinePlayerState are not used.

BP_FB_OnlineGM :

  • EventOnSwapPlayerControllers
  • SpawnPlayer
  • EventOnLogout
  • UpdateChat

BP_FD_OnlinePC :

  • EventBeginPlay
  • PassCharacterInfoToServer (only on server)
  • SetupUI (only client)
  • GetChatMessage (only on server)
  • UpdateChatWindow (only on client)
  • InputActionChat

Share Button