Disclaimer: I am a noob in networking. I experienced many problems, it took a long time (months) before I managed to get an simple game working as multiplayer on my own VPS. So below you read the experience I had in achieving this humble goal. No guaranty that this is the correct method.
Update Sept 2020 Finally a comprehensive video explaining the proces.
I am using a VPS at my University. For building I used the following information:
Update: For step 0 to 5 I found this guide
Step 0 Free space
Create enough free space on your disk, at least 200 gb
Step 1 Install VS 2019
Install Visual Studio 2019 community and tools
Yes I use VS 2019
Step 2 Getting source Unreal Engine
Download and install git
Download the Unreal Engine from github.
command release : git clone https://github.com/EpicGames/UnrealEngine.git
I downloaded version 4.25.3
Use Git to download the engine. I also tried the ZIP file, but it looks like I had more problems when building the engine based on the zipfile.
Step 3 Preparing for build
Running the setup.bat and GenerateBatchfiles.bat.
It is important you use cmd as administrator.
At first I just clicked on the files in the explorer, that give me problems.
Step 4 Building engine in VS 2019
Start building the engine with VS 2019. In the video some changes in the C++ code are made. This not necessary for UE 4.25.3 which I used.
After starting up VS 2019 it says “ready”, while in the background al kind of processes are going on. I start to build after VS 2019 tells me that all background processes are finished (superstitious?)
Don’t forget to set UE4.sln as the startup project in VS2019
Don’t forget to set the Development Editor.
Building can take some time depending on your processor.
I recently bought a Ryzen 9 3900X which makes me very happy 🙂
Step 5 Errors
Dealing with errors during compiling the engine.
My best advice: When problems occur, delete everything from your disk (probably not VS2019) and start al over again.
Step 6 Start project and build server and client in VS 2019
Start a C++ project in UE.
Do all things explained in the “Creating A Project” in the medium article stop at “Packaging The Server”
If everything went according plan you have a UE multiplayer project, compiled as server and client.
NOTE: Add 27.0.0.1:7777 (=localhost) in the open level node instead of 0.0.0.0:7777
Step 7 Package server and client
Packaging the project. Follow the “Packaging The Server” and “Packaging The Client” parts from the medium article.
Only select build for Windows instead of Linux.
Working with a Windows server is much much much easier and less less less work compared to Linux. Maybe a Linux VPS is cheaper, but time is also money :-).
NOTE: You can do the packaging more efficient by using the Project Launcher (windows -> project launcher)
You are going to package the game a lot of times, because actually running the game on your server is the only to be 100% sure everything is working. You can do these test by running on your local server. I only submit changes to my perforce depot after testing :-).
NOTE2: You als can use the UnrealFrontend, even as an separate tool
Step 8 Preparation for Test on localhost on Windows with logging
Make sure 127.0.0.1:7777 (=localhost) is in the open level node in the level blueprint of the map EntryLevel. If this is not the case, make the adjustment and package again for client and server.
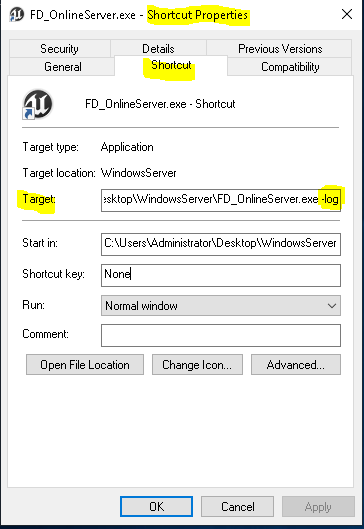
Go the folder WindowsServer folder, right mouse click on the application and choose “create shortcut”. Right click on the shortcut, go to properties and add -log. See picture. Do the same for the application in the WindowsNoEditor map.
Step 9 Test on localhost.
Click on the shortcut of the server. You should see the log window.
If everything went well, the server is ready and running.
Click on the shortcut of the client. Log windows starts en hopefully you enter the game. Probably you need to use alt tab to switch to the log window.
Click an second time on the shortcut of the client to start an second one.
Keep starting clients if you want.
You can close a client by using Alt F4 in the client window or just close the log window.
For me this was my first hallelujah moment. 🙂
Step 10 Problems when testing on the local server.
If you are lucky you get red error messages in you log screen.
Otherwise delete everything and start all over.
Maybe you did not used the Third person sample project, but a project of your own.
That is the mistake I made. My strategy is now to start with a working multiplayer game and start making changes to this model. I use perforce so I can always return to a working project.
Step 11 Get VPS
Get a VPS. Currently I am using a Strato V20 . Maybe I have to upgrade in the future. Or use a VPS at my University.
Of course I also looked at AWS Gamelift. But I don’t need to run instances for example. Gamelift looks very difficult for my project. I just want to run one virtual world, which can be visited by students to study Fluid Dynamics. I estimate 20-30 students each time.
Step 12 Making contact with your VPS
You can use “Remote Desktop Connection” to connect to your VPS. This really is great.
You are seeing and using windows on your VPS.
For example run CMD and ipconfig on your VPS to check the address of your server.
Step 13 Open port 7777 on your VPS and provider
The unreal engine server needs port 7777 to communicate.
First you have open port 7777 in the firewall.
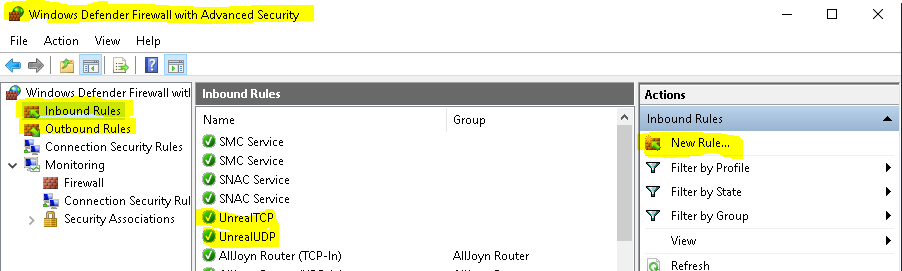
On your VPS, using your Remote Desktop Connection, search for
“Windows Defender Firewall with Advanced Security”
Add Inbound Rules and Outbound Rules for TCP 7777 en UDP 7777 ports.
Note: I am not sure if both TCP and UDP are necessary.
Note : Without the UDP port it won’t work!
Second: you also have to open the ports in de system of you provider which is controlling the VPS!
This is different for each provider. Strato has a tool called PLESK. You have to search for security and rules. If you don’t open port 7777 in this system, it won’t work.
Note: You have to reboot your VPS server to get the changes working
Step 14 Package client and server for VPS
Set the correct IPV4 adres in the in the open level node in the level blueprint of the map EntryLevel. Package server and client.
Step 15 Run the server on you VPS.
Connect to your VPS and copy the WindowsServer map to your vps.
Make the shortcut with -log (see step 8).
Click on the shortcut, the log screen should occur on you VPS.
Note: The first time, Unreal Engine is going to install additional programs.
I had a problem with Net Framework 3.5. I had to install this manually with the cmd on the VPS
Click on the shortcut of client (WindowsNoEditor) on you local computer.
If everything is okay you should get access to the server.
Start joyful screaming, you did it.
Step 16 Run client from other computers
You can just copy the WindowNoEditor map to other computers and run it.
Sometimes some additional programs are automatically installed bij Unreal
Step 17 Errors when running the server and the client
Some suggestions:
1. When building in VS 2019 use rebuilt instead of built
2. Got to your project folder, delete all maps except Config, Content en Source.
Also delete the .sln file. Right click on you project file, select <generate VS project files>.
Start building everything allover 🙂
Step …
So now you have a working multiplayer and you can start making adjustments to build your unreal engine project. You have taken 17 steps just to get starting 🙂
