The steps I took to build a dedicated server. My goal is to get my project online and used as a multiplayer. I have windows 10 on a desktop.
My goal is not to change C++ code in the unreal engine.
Some useful sites:
https://wiki.unrealengine.com/Dedicated_Server_Guide_(Windows_%26_Linux)
Below the steps I took to build a dedicated server.
- Install Visual Studio Community 2017.
Important: install the correct components for UE4 development, check the “Game Development with C++” workload, and the “Unreal Engine Installer” optional component.
Note: It is not necessary to install all the azure stuff - Install Visual C++ 2015 building tools
As I understand, you really need to install this! - Make Account at Github .
Note: Don’t install the Github Desktop app. - Make a connection between your Unreal account and Github account.
Open your Unreal account on the unreal website , go to “account” , “personal”, “profile”. You will find a field for your GitHub account name.
Note: You will get some notification email from epic
Note: Many tutorials show how to make a fork. Because I don’t want to change the C++ code, I did not make a fork at github.
Note: I can’t remember when it is asked, but you should select the “release” branch of Unreal.
If everything went well, EpicGames is added as an organization on your github account. You should be able to go to Epicgames on github. You don’t have to do anything on this page. - Download the engine as a zip file and unpack
- Go to the map where the engine is unpacked .
Run Setup.bat (just double click on the file)
Run GenerateProjectFiles.bat (just double click on the file)
Note: When running the Setup.bat I got the following error: Failed to download ‘http://cdn.unrealengine.com/dependencies/2636758-e606e606851e4693b1729dd35dcef7ae/345f37ad429b27f1360cf26aa535ef037724f7c4’: Het opgegeven pad, de bestandsnaam of beide zijn te lang. De volledig gekwalificeerde bestandsnaam moet minder dan 260 tekens bevatten en de mapnaam minder dan 248 tekens. (PathTooLongException)
I copied the project to a dir/subdir/subdir….. To solve this I moved the projectmap to the root!!! Stupid problem, took me hours. - Open VS 2017 by double click on UE4.sln.
Note: The width of the “solution configuration”. box is small.
“right mouse” bar at the box, select “customize”, see picture
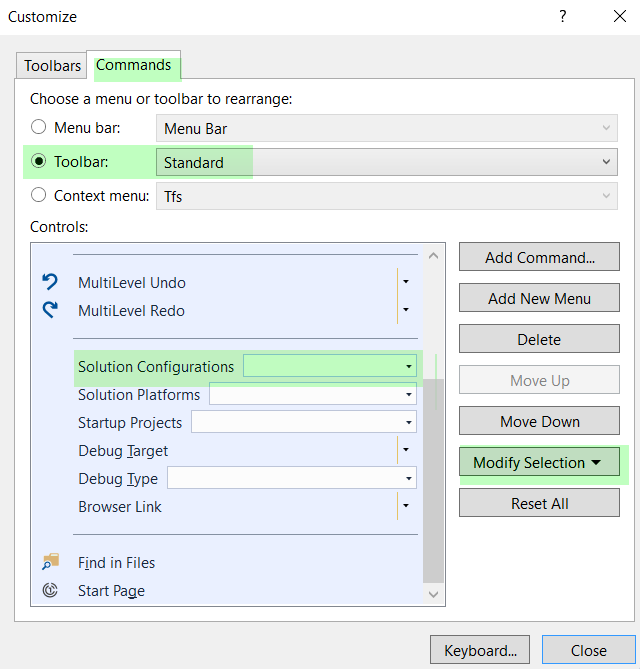
In “modify Selection” you can change the width (200) - You should see the following settings. Much to my surprise? compiling is done with 2015?

- Build by “right mouse” click on UE4 in VS 2017 en “build”
- Run the UE editor.
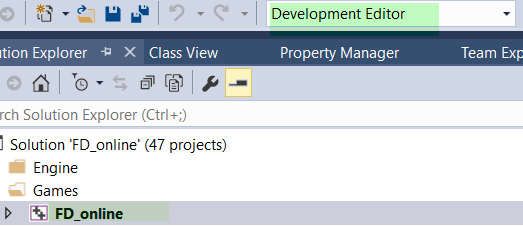
Make sure “Development editor” is selected in the “solution configuration” box
In VS 2017 “right mouse” click on UE4, “Debug”, “Start new instance”
Note : Besides the editor, you also have the launcher. I don’t believe the launcher is included in the C++ source. But because I have downloaded and installed the launcher on my computer, at some point it starts to appear when starting the UE editor. If you want you can just close it.
Note: In VS 2017 I have opened the “Diagnostic tools”, to see what is happening - Build the cooked version.
Open your project in the UE editor.
Some important settings are discussed in the following post.
Go to “File” , “Package project”, “Packaging settings”
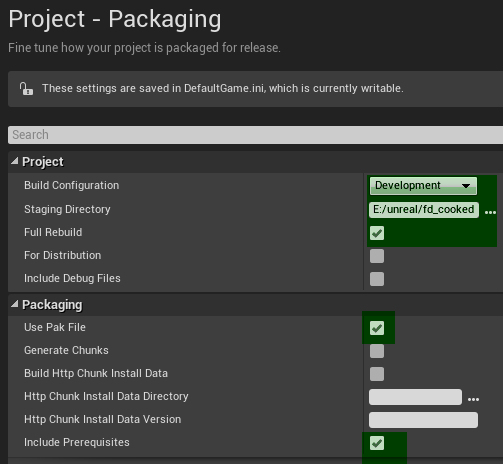
Note: Make a separate map for the cooked project
Go to “file” and:
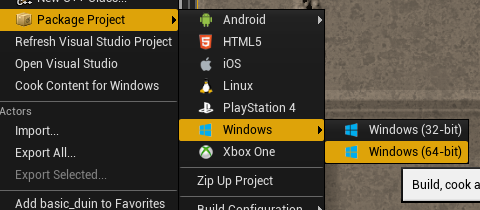
This will take some time, open “show output log” to see the action.
!!!!Hopefully no error occurs!!!! - Run you project outside of UE editor.
Note: This step is not really necessary, but you are just going to look how your project looks.
Go to your cooked map / WindowsNoEditor.
Run the exe file and hopefully, you get what you want 🙂 - Add C++ code to the project.
At first I was not able to do the following steps. This because I could not find the C++ files of my project. It took me some time, but it turned out that I had to add these to my project!!grrr.
Go to “file” in the UE editor. Select “New C++ class”. Don’t change any setting, just run the thing.
Go to “file” again. Select “Refresh Studio Vision project”
Go to “file” again. Select “Open Visual Studio”
Your project should appear in VS 2017
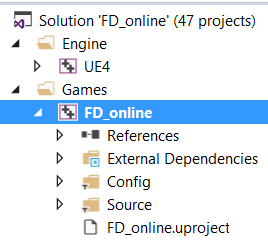
Also in the map of your project, you will find C++ code. (At the source map) - Preparation for compiling the server, generate VS 2015 file from the project.
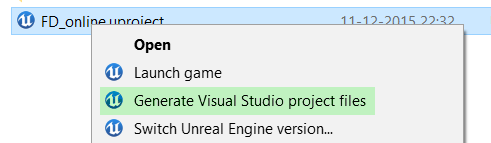
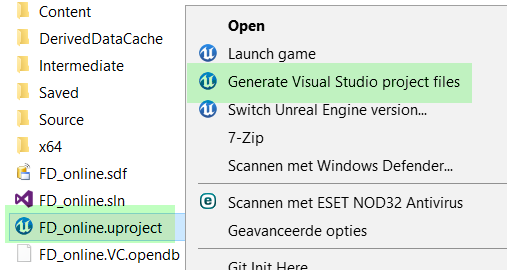
Go to the project map (not the cooked one). “Right mouse” click on the .uproject file, select generate VS files.
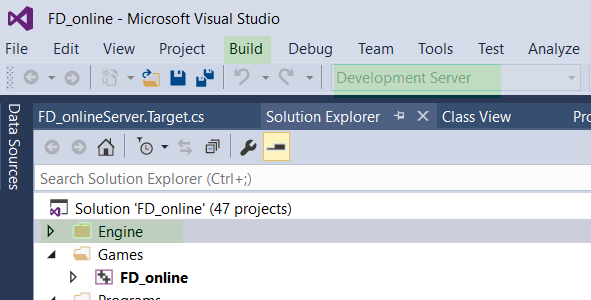
- Build the project, combined with editor, in VS 2015
Build the project, with the “solution configuration” box set to Development editor.
Select your project, “right mouse” click and “build” - Prepare for building the server. Making “project”Server.Target.cs
Link to template you have to use
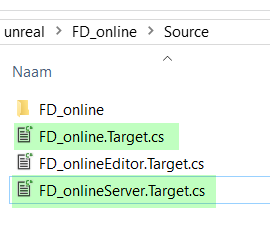
According to the tutorials, I should make an copy of “project”.Target.cs and rename it to “project”Server.Target.cs. In VS 2015 I could not make this copy.
So I did this with windows explorer. Go to the source map of your project.
Copy and paste “project”.Target.cs and rename to “project”Server.Target.cs.
Double click on “project”Server.Target.cs , so the file is opened in VS 2015.
Clear all content
Copy the template from link in the file.
At 3 locations you have to replace game by the project name. In my case FD_online.
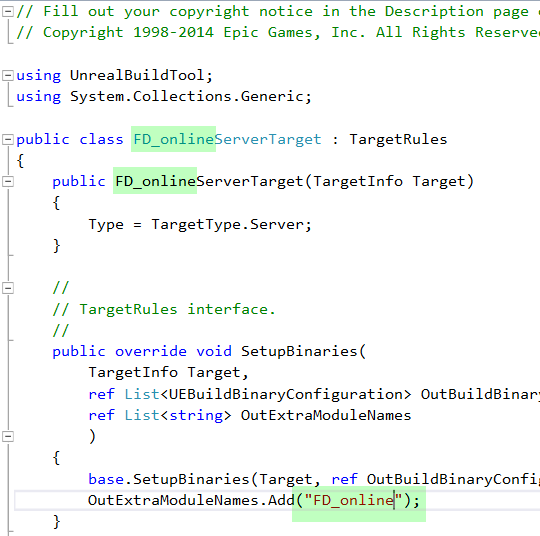
Save file - Generate VS 2015 files again.
Go to your project map with the explorer, “right mouse” on the .uproject and generate visual studio project files
Go back to VS 2015. It will ask to reload the files - Building the server!!
Set “solution configuration” box set to Development server
Hit Build and be patient
- Finalizing the server.
Go to your project /binaries/Win64.
Find “project”Server.exe.
Copy this file to your cooked version (see step 11) and paste the file in the /binaries/Win64 map.
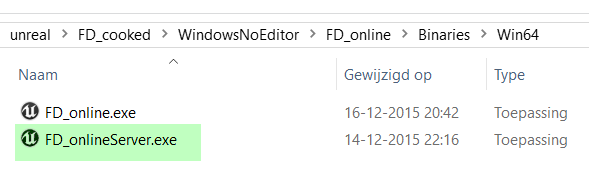
So the cooked map contains all files for both server and client.
How to run server and client on your computer (test).
- Open cmd
- Got to map with server
- Type FD_onlineServer.exe -log
- Hit FD_online.exe
- Open commandline (in my case tab)
- Type open 127.0.0.1:7777
- Your are connected to the server.
Note: If screen is black, check following settings
I could open 4 clients